
From Zero to GitOps: Deploying Mage AI on Local Kubernetes with Argo CD
This is the second part of DevOps for Data Engineers series


Hey again, fellow tech enthusiasts!
In my previous post, I showcased how to build a robust continuous integration pipeline using semantic versioning to properly tag your Docker artifacts. This ensures that each build is versioned consistently, making it easier to manage and deploy your applications.
But building artifacts is just the first step. The next challenge is deploying them efficiently and reliably. That's where Kubernetes and Argo CD come into play.
Kubernetes is a well-known open-source container orchestration platform that automates deploying, scaling, and managing containerized applications. It has become the industry standard for running applications in a cloud-native environment.
Argo CD is a declarative, GitOps continuous delivery tool for Kubernetes. It synchronizes your Kubernetes clusters with configurations stored in Git repositories, ensuring your deployments are always up-to-date and reproducible.
In this part of the series, we'll dive into setting up a local Kubernetes cluster to run our containers and configure Argo CD to perform continuous delivery. By the end of this guide, you'll have a local environment ready to deploy your Docker artifacts seamlessly.
We’ll also deploy MageAI—the project for which we built our CI pipeline—to demonstrate how to deploy a service both with and without Helm.
Although, this isn’t a data engineering task, if you work with Kubernetes (as I have since I became data engineer), then might be good to have some high level knowledge on how to deploy in K8s
Let's get started!
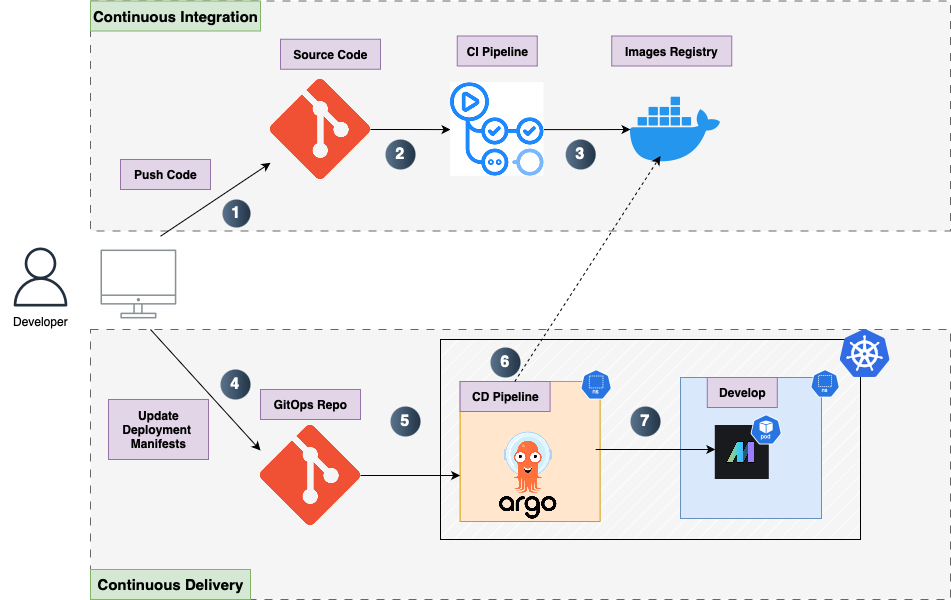
Below is the complete Continuous Integration - Continuous Delivery flow.
In this post we will focus on Continuous Delivery part.
🚀 Installing Kubernetes Locally with KinD and Setting Up Ingress
In this section, we’ll set up a local Kubernetes cluster using Kind (Kubernetes in Docker) and then install an NGINX Ingress Controller. This will allow us to expose our applications via friendly hostnames rather than juggling different port-forwarding commands.
My preferred choice is KinD because it's more lightweight compared to Minikube, but both are excellent options for local development.
🛠️ 1. Installing KinD and Helm
For Mac users, follow these steps to install KinD and Helm using Homebrew:
Install KinD:
brew install kindInstall Helm (we'll use this later for deploying applications):
brew install helm📄 2. Creating a KinD Cluster Config with Ingress Support
Kind uses a cluster configuration file to customize the cluster setup—particularly useful if you want to map host ports (e.g., 80 and 443) to containers or add node labels.
Create a file called kind-config.yaml with the following content:
# kind-config.yaml
kind: Cluster
apiVersion: kind.x-k8s.io/v1alpha4
nodes:
- role: control-plane
  kubeadmConfigPatches:
  - |
    kind: InitConfiguration
    nodeRegistration:
      kubeletExtraArgs:
        node-labels: "ingress-ready=true,kubernetes.io/os=linux"
  extraPortMappings:
  - containerPort: 80
    hostPort: 80
    protocol: TCP
  - containerPort: 443
    hostPort: 443
    protocol: TCP
📝 Explanation:
extraPortMappings:Maps ports 80 (HTTP) and 443 (HTTPS) on your local machine to the corresponding ports inside the cluster.
This configuration enables external traffic to be routed through the Ingress controller without additional port forwarding.
Node Label:ingress-ready=truecan be used by Ingress controllers for scheduling or detection.
If you prefer not to set kubeadmConfigPatches, you can do it manually:
Create the cluster without the patch.
Label the control-plane node:
#to get the control-plane-name
kubectl get nodes --show-labels
kubectl label node <control-plane-name> ingress-ready=true
Either approach works fine.
🚀 3. Creating the KinD Cluster
Create the cluster using the config file and give it a custom name:
kind create cluster --config kind-config.yaml --name turorial-devThen you should see the following:
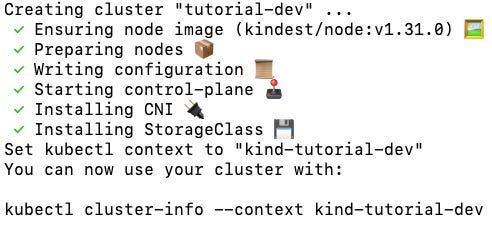
After the cluster is created, KinD will automatically prefix the name with kind-, so the full name becomes kind-tutorial-dev.
✅ Check Your Cluster Contexts
To list the available clusters and see the active context:
kubectl config get-contexts
To switch to your new cluster:
kubectl config use-context "name of cluster to switch to"🌐 4. Installing the NGINX Ingress Controller
Now, let's install the NGINX Ingress controller to manage external traffic:
kubernetes-roadmap % kubectl apply -f https://raw.githubusercontent.com/kubernetes/ingress-nginx/main/deploy/static/provider/kind/deploy.yamlThis command pulls the latest configuration from the
mainbranch. For a more reproducible setup, consider referencing a specific commit or release tag in the URL.
📝 Why NGINX?
NGINX is a reliable and widely-used Ingress controller.
It supports basic routing, SSL termination, and host/path-based routing.
For advanced traffic management (like service meshes), tools like Istio might be more suitable.
Now we're ready to deploy applications and route traffic using Ingress! 🚀
Note: that Nginx installed this way it will automatically create its own namespace called
ingress-nginx. You can check the namespaces by typingkubectl get namespaces
🚀 Setting Up Argo CD on KinD
The first application we will deploy is Argo CD. Argo CD is a declarative, GitOps continuous delivery tool for Kubernetes. It automates the deployment and management of applications by syncing your cluster state with configurations stored in a Git repository.
🛠️ 1. Install Argo CD
Argo CD is typically deployed into its own namespace, usually argocd.
Create the argocd Namespace and Install Argo CD
Run the following commands to install Argo CD in your cluster:
# Create the argocd namespace

kubectl create namespace argocd

# Install Argo CD using the official manifests

kubectl apply -n argocd -f https://raw.githubusercontent.com/argoproj/argo-cd/stable/manifests/install.yaml
As with NGINX Ingress, you might reference a specific version or release of Argo CD for reproducibility
Verify the Installation
Check if the Argo CD pods are running:
kubectl get pods -n argocdYou should see output similar to the one below (let it run for a few seconds):

🌐 2. Expose the Argo CD Server
By default, the Argo CD server is exposed as a Kubernetes Service of type ClusterIP, which isn't accessible outside the cluster. We'll expose it using port forwarding or Ingress.
Option 1: Port Forwarding
Port forward the Argo CD server service to access the UI on your local machine (type this one on a separate terminal):
kubectl port-forward svc/argocd-server -n argocd 8080:80Now you can access the Argo CD UI at:
http://localhost:8080You should be able to see the UI but you cannot login yet.
If you prefer this option then scroll down to the part that we retrieve the password and use it directly
Option 2: Expose via Ingress
Since we deployed our cluster with Ingress, it makes sense to utilize it to access Argo CD.
While port forwarding works well for individual applications, it becomes cumbersome when you have multiple services and need to remember various ports.
Ingress provides a more streamlined approach by enabling access through a single hostname and managing routing efficiently.
📄 Creating the Ingress Resource
To expose Argo CD via Ingress, we need an Ingress resource. This resource defines the rules for routing external traffic to the Argo CD server. In your repository, under apps/argocd/base, create an ingress.yaml file with the following content:
#ingress.yaml
apiVersion: networking.k8s.io/v1
kind: Ingress
metadata:
  name: argocd-ingress
  namespace: argocd
  annotations:
    # Enable SSL redirection
    nginx.ingress.kubernetes.io/ssl-redirect: "true"
    nginx.ingress.kubernetes.io/backend-protocol: "HTTPS"
    # Disable SSL redirection since we're not using TLS
    #nginx.ingress.kubernetes.io/ssl-redirect: "false"
spec:
  ingressClassName: nginx  # Specify the Ingress controller if required
  rules:
    - host: argo.dev.com  # Replace with your domain or subdomain
      http:
        paths:
          - path: /
            pathType: Prefix
            backend:
              service:
                name: argocd-server
                port:
                  number: 443
  tls:
    - hosts:
        - argo.dev.com  # Same as above
      secretName: argocd-tls  # Name of the TLS secret
🔒 Understanding TLS in Ingress
What is TLS?
Transport Layer Security (TLS) provides encryption and security for data transmitted over the network. In the context of Ingress, TLS ensures that the communication between your browser and the Argo CD server is secure and encrypted.
How TLS Works with Ingress
TLS Section: The
tlssection iningress.yamlspecifies the host (argo.dev.com) that should use TLS and the secret (argocd-tls) containing the certificate and key.SSL Redirection: The annotation
nginx.ingress.kubernetes.io/ssl-redirect: "true"enforces redirection from HTTP to HTTPS, ensuring secure connections.
🛠️ Steps to Generate the Self-Signed TLS Certificate
If you don't have a trusted TLS certificate, you can create a self-signed certificate for local development. Follow these steps:
1. Generate the Certificate and Key with OpenSSL
Run the following command to generate a self-signed TLS certificate and key:
openssl req -x509 -nodes -days 365 -newkey rsa:2048 \ -keyout tls.key -out tls.crt -subj "/CN=argo.dev.com/O=argo.dev.com"This command does the following:
Generates a new RSA key (
tls.key).Creates a self-signed certificate (
tls.crt) valid for 365 days.Sets the Common Name (CN) to
argo.dev.com.
2. Verify the Files
Check if the files were generated:
ls -l tls.*You should see:
-rw------- 1 user group 1704 Jun 12 12:00 tls.key
-rw-r--r-- 1 user group 1236 Jun 12 12:00 tls.crt
3. Create the Kubernetes Secret
Now that the files exist, create the TLS secret:
kubectl create secret tls argocd-tls \ --namespace argocd \ --cert=tls.crt \ --key=tls.key4. Verify the Secret
Check that the secret was created successfully:
kubectl get secret argocd-tls -n argocdExpected output:
NAME TYPE DATA AGE
argocd-tls kubernetes.io/tls 2 5s
📦 Using kustomization.yaml
Even for a single deployment, using a kustomization.yaml file is a good practice. It allows for easier extensibility and management as your project grows. Your kustomization.yaml in the argocd/base directory can look like this:
#base/kustomization.yaml
resources:
  - ingress.yaml
However in dev folder kustomization.yaml looks like this:
#dev/kustomization.yaml
resources:
  - ../base
Then to apply ingress go inside the dev folder and run
kubectl apply -k .🌐 Configuring DNS for Local Access
To ensure that argo.dev.com resolves to your local machine, open the hosts file by running

and add the following entry:
127.0.0.1 argo.dev.com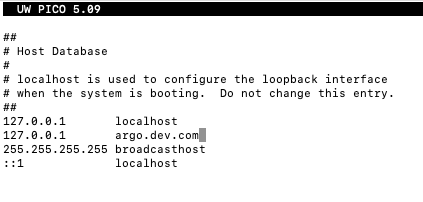
CTRL-O to save Enter and CTRL-X to exit and apply the changes.
With this process we map argo.dev.com to localhost, allowing us to access Argo CD via:
https://argo.dev.comNow, we can access the UI by the URL without the need of port forward every time.
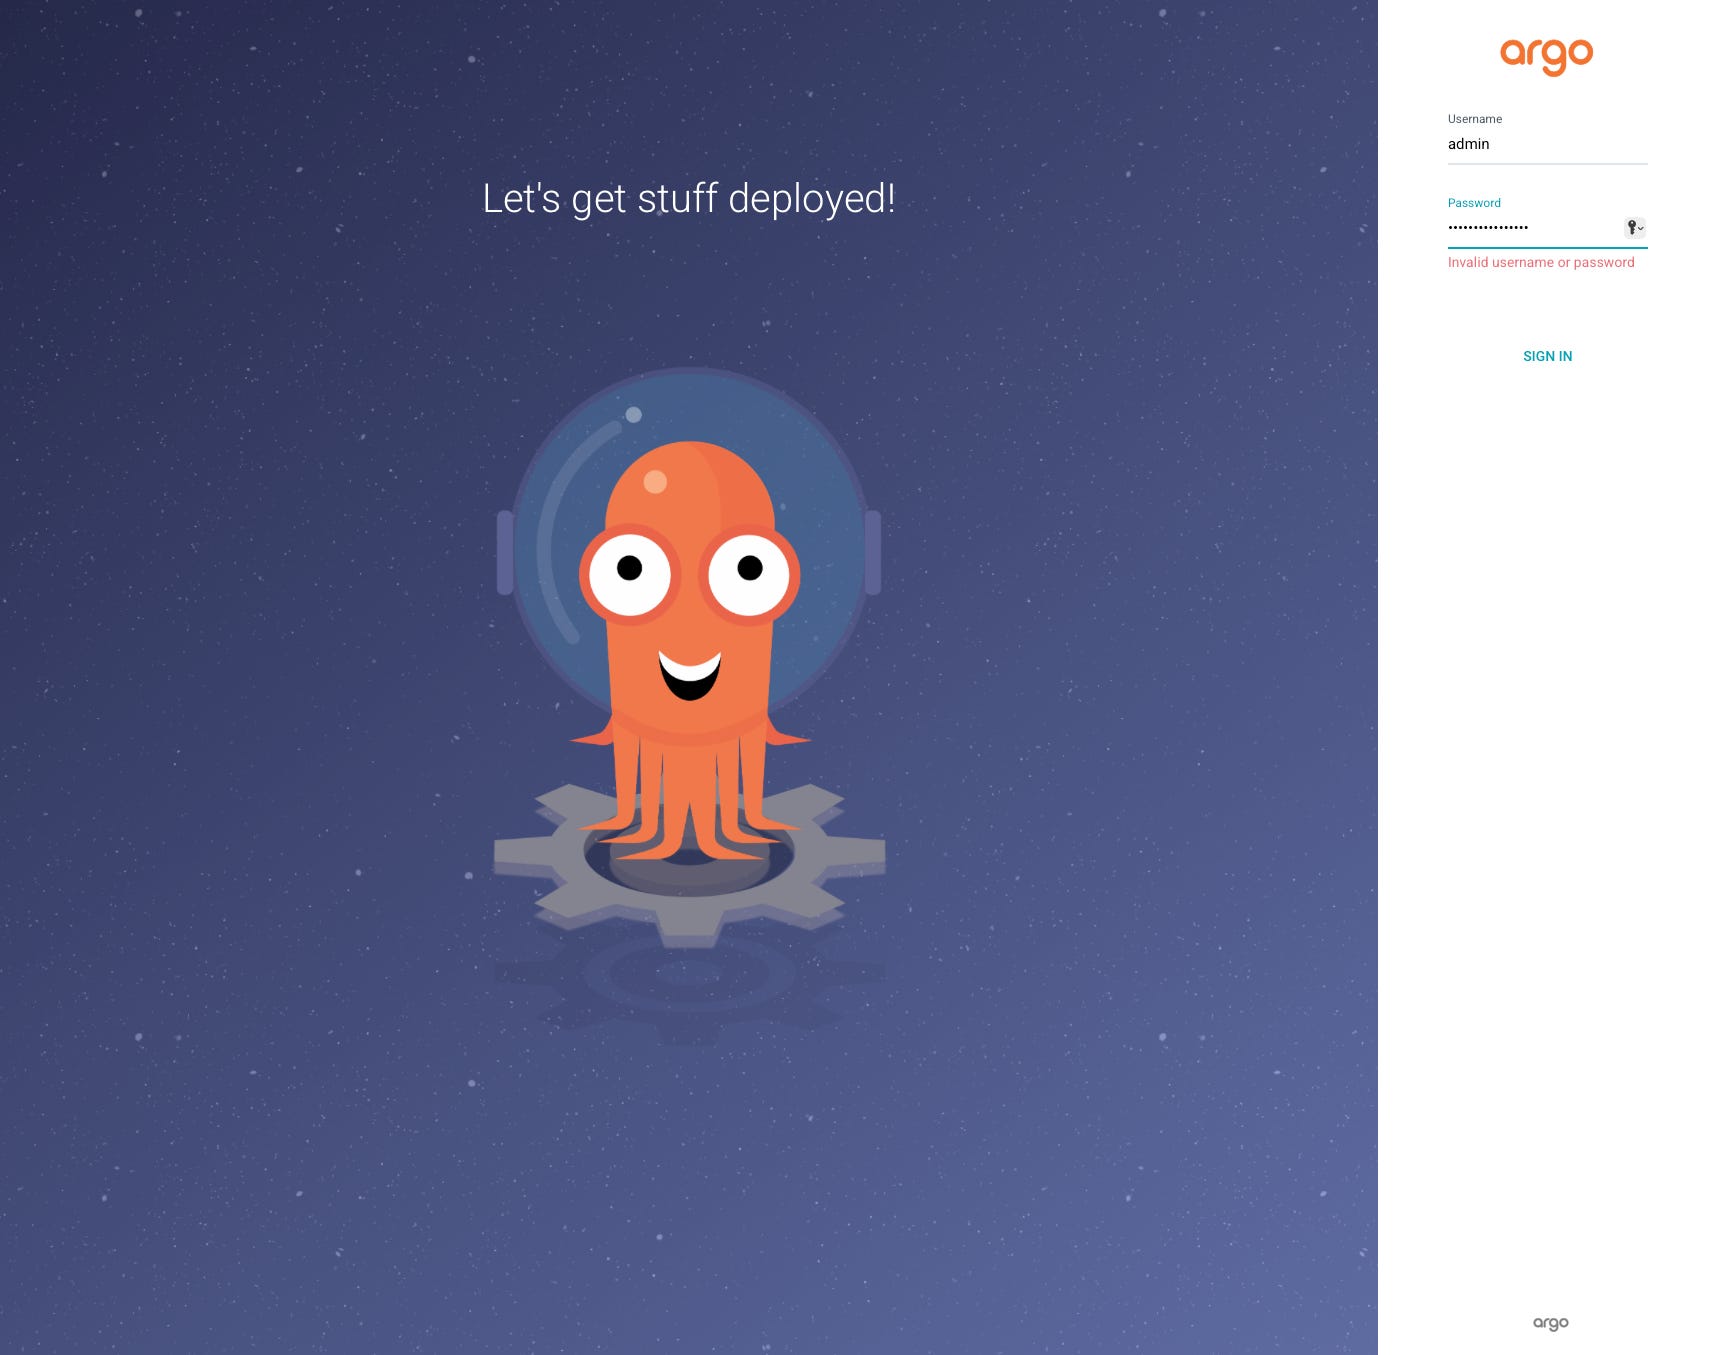
🔑 Retrieving the Argo CD Admin Password
To log in to Argo CD, retrieve the initial admin password with the following command:
kubectl get secret argocd-initial-admin-secret -n argocd -o jsonpath="{.data.password}" | base64 -dNow by using admin as username the password you will get, you should be able to see the Argo CD portal.
🔗 Configuring a Repository in Argo CD
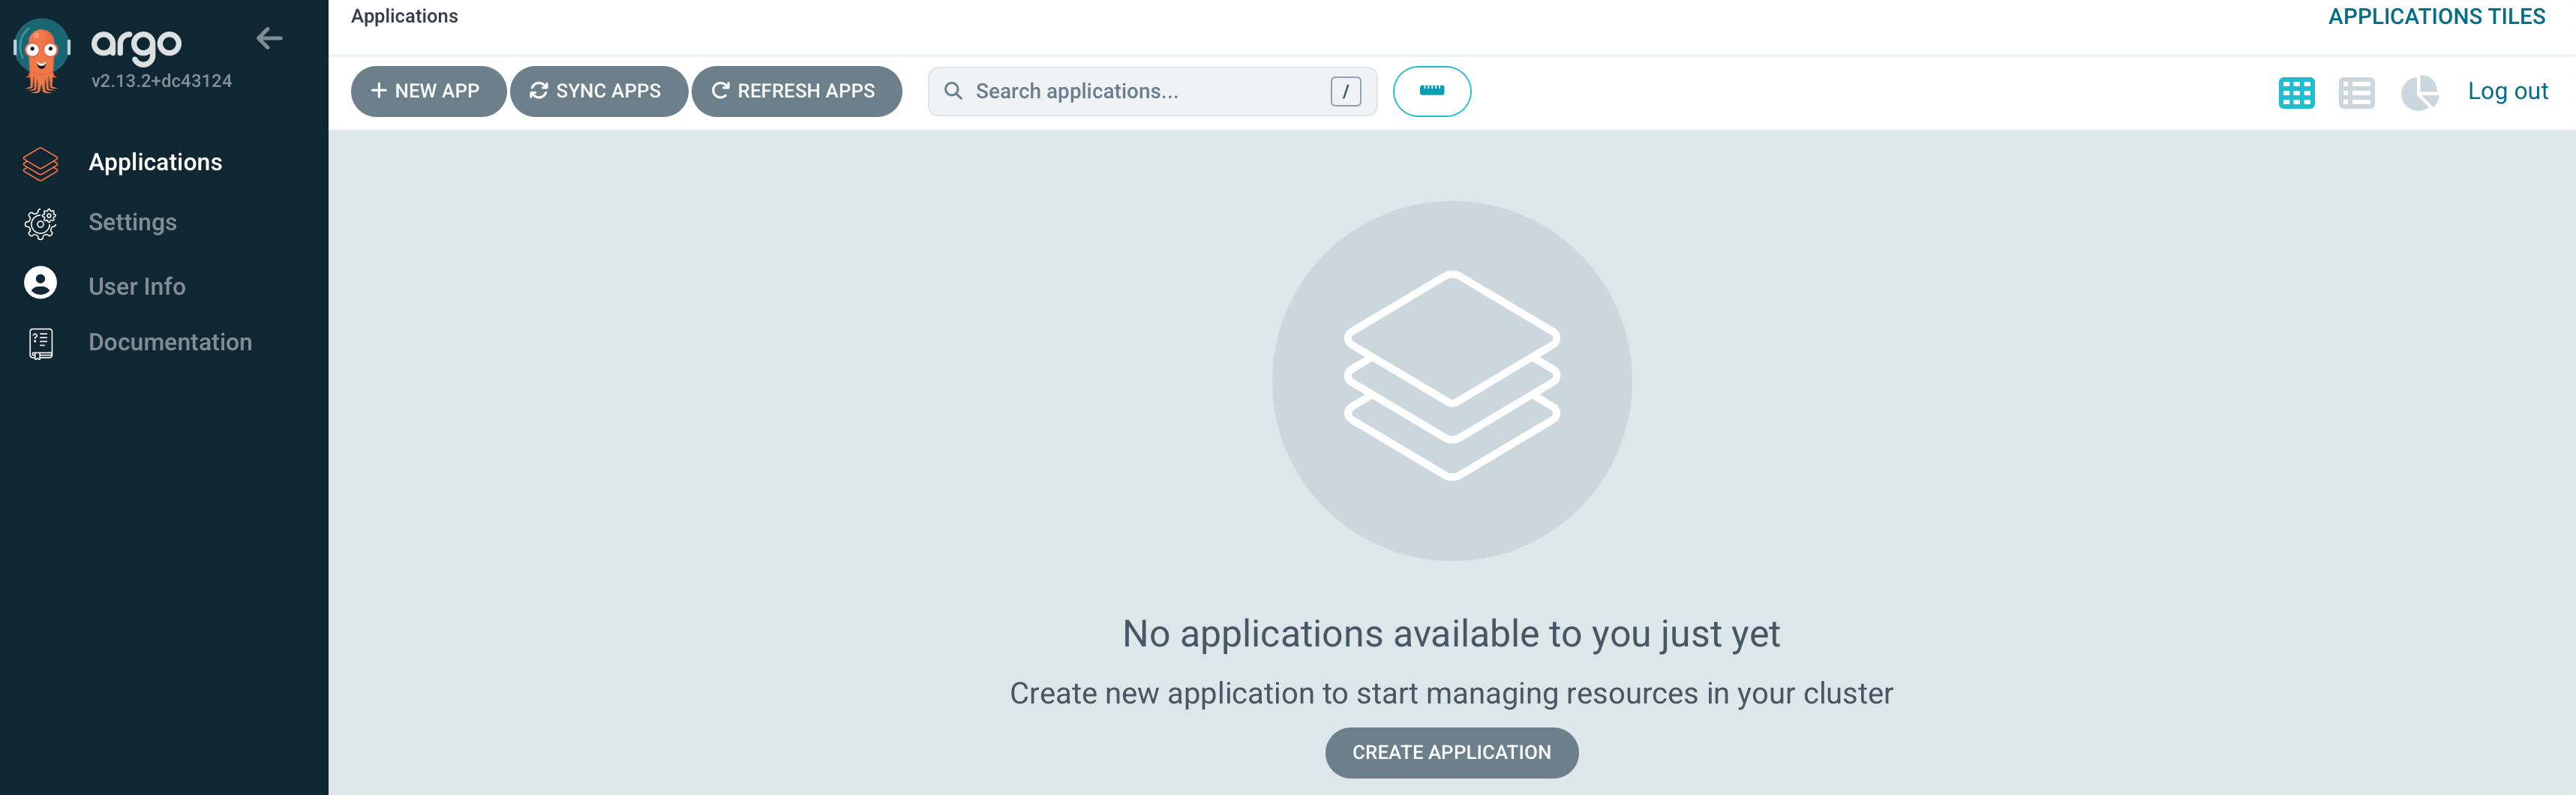
Now that we have Argo CD up and running, the next step is to link it to our Git repository. This allows Argo CD to track and deploy applications defined in the repository. We'll do this using the Argo CD UI.
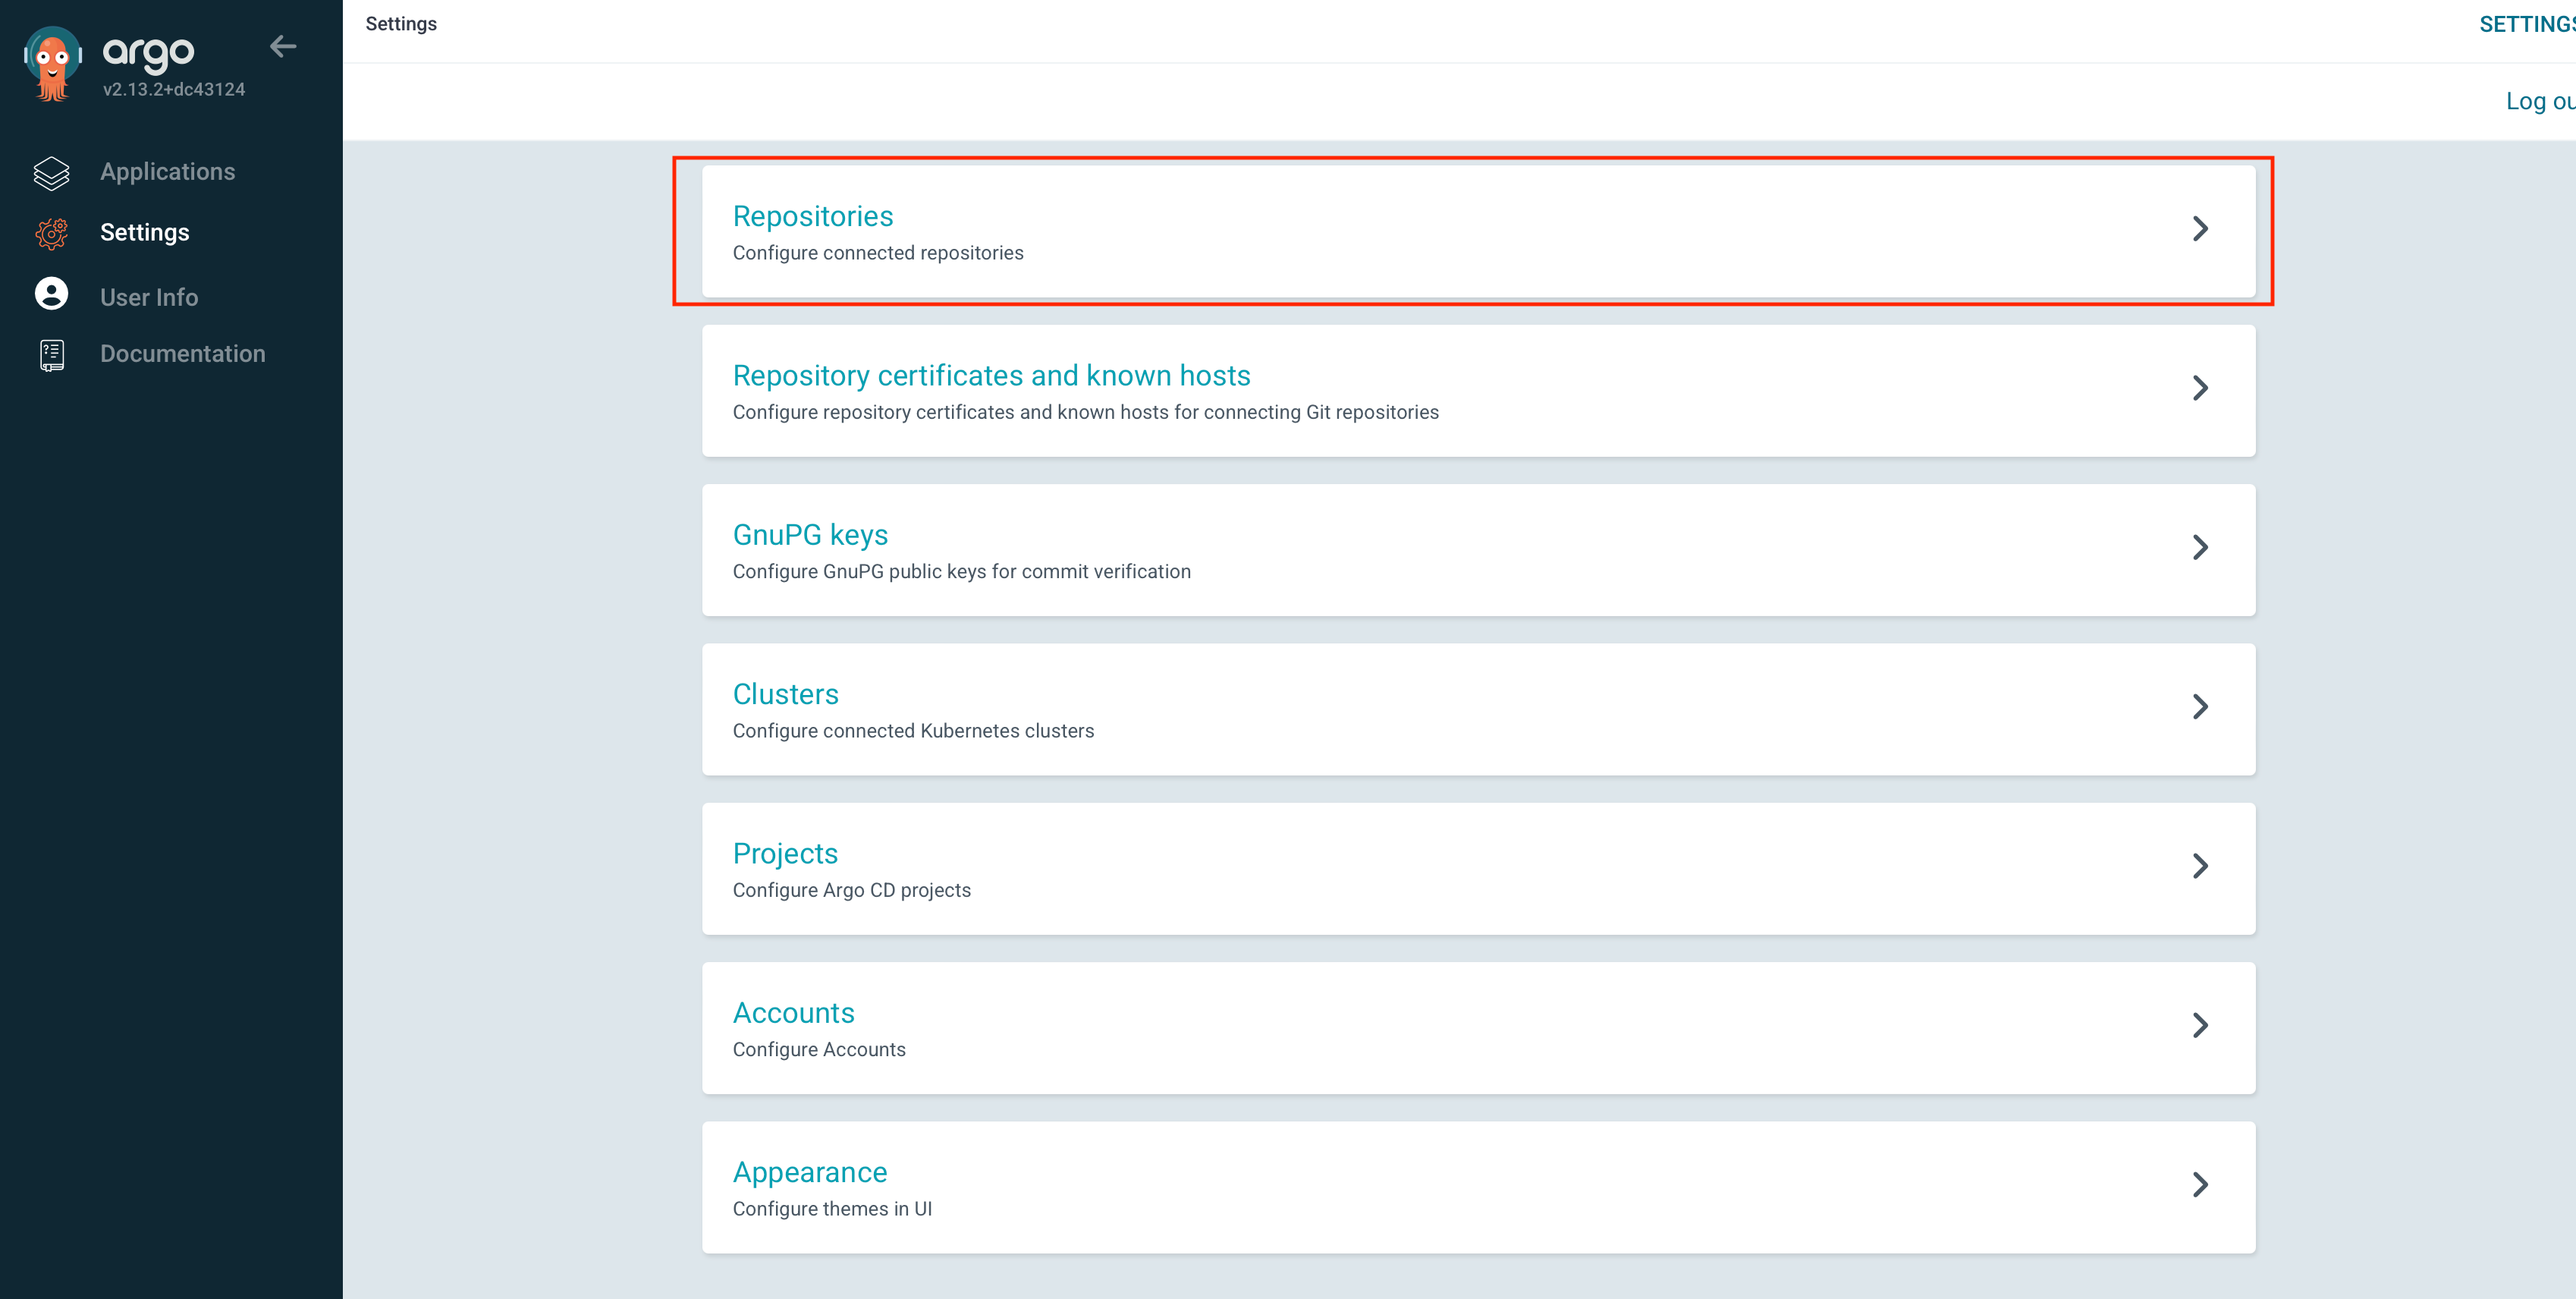
In the left sidebar, click on Settings (the gear icon). From the Settings menu, select Repositories.
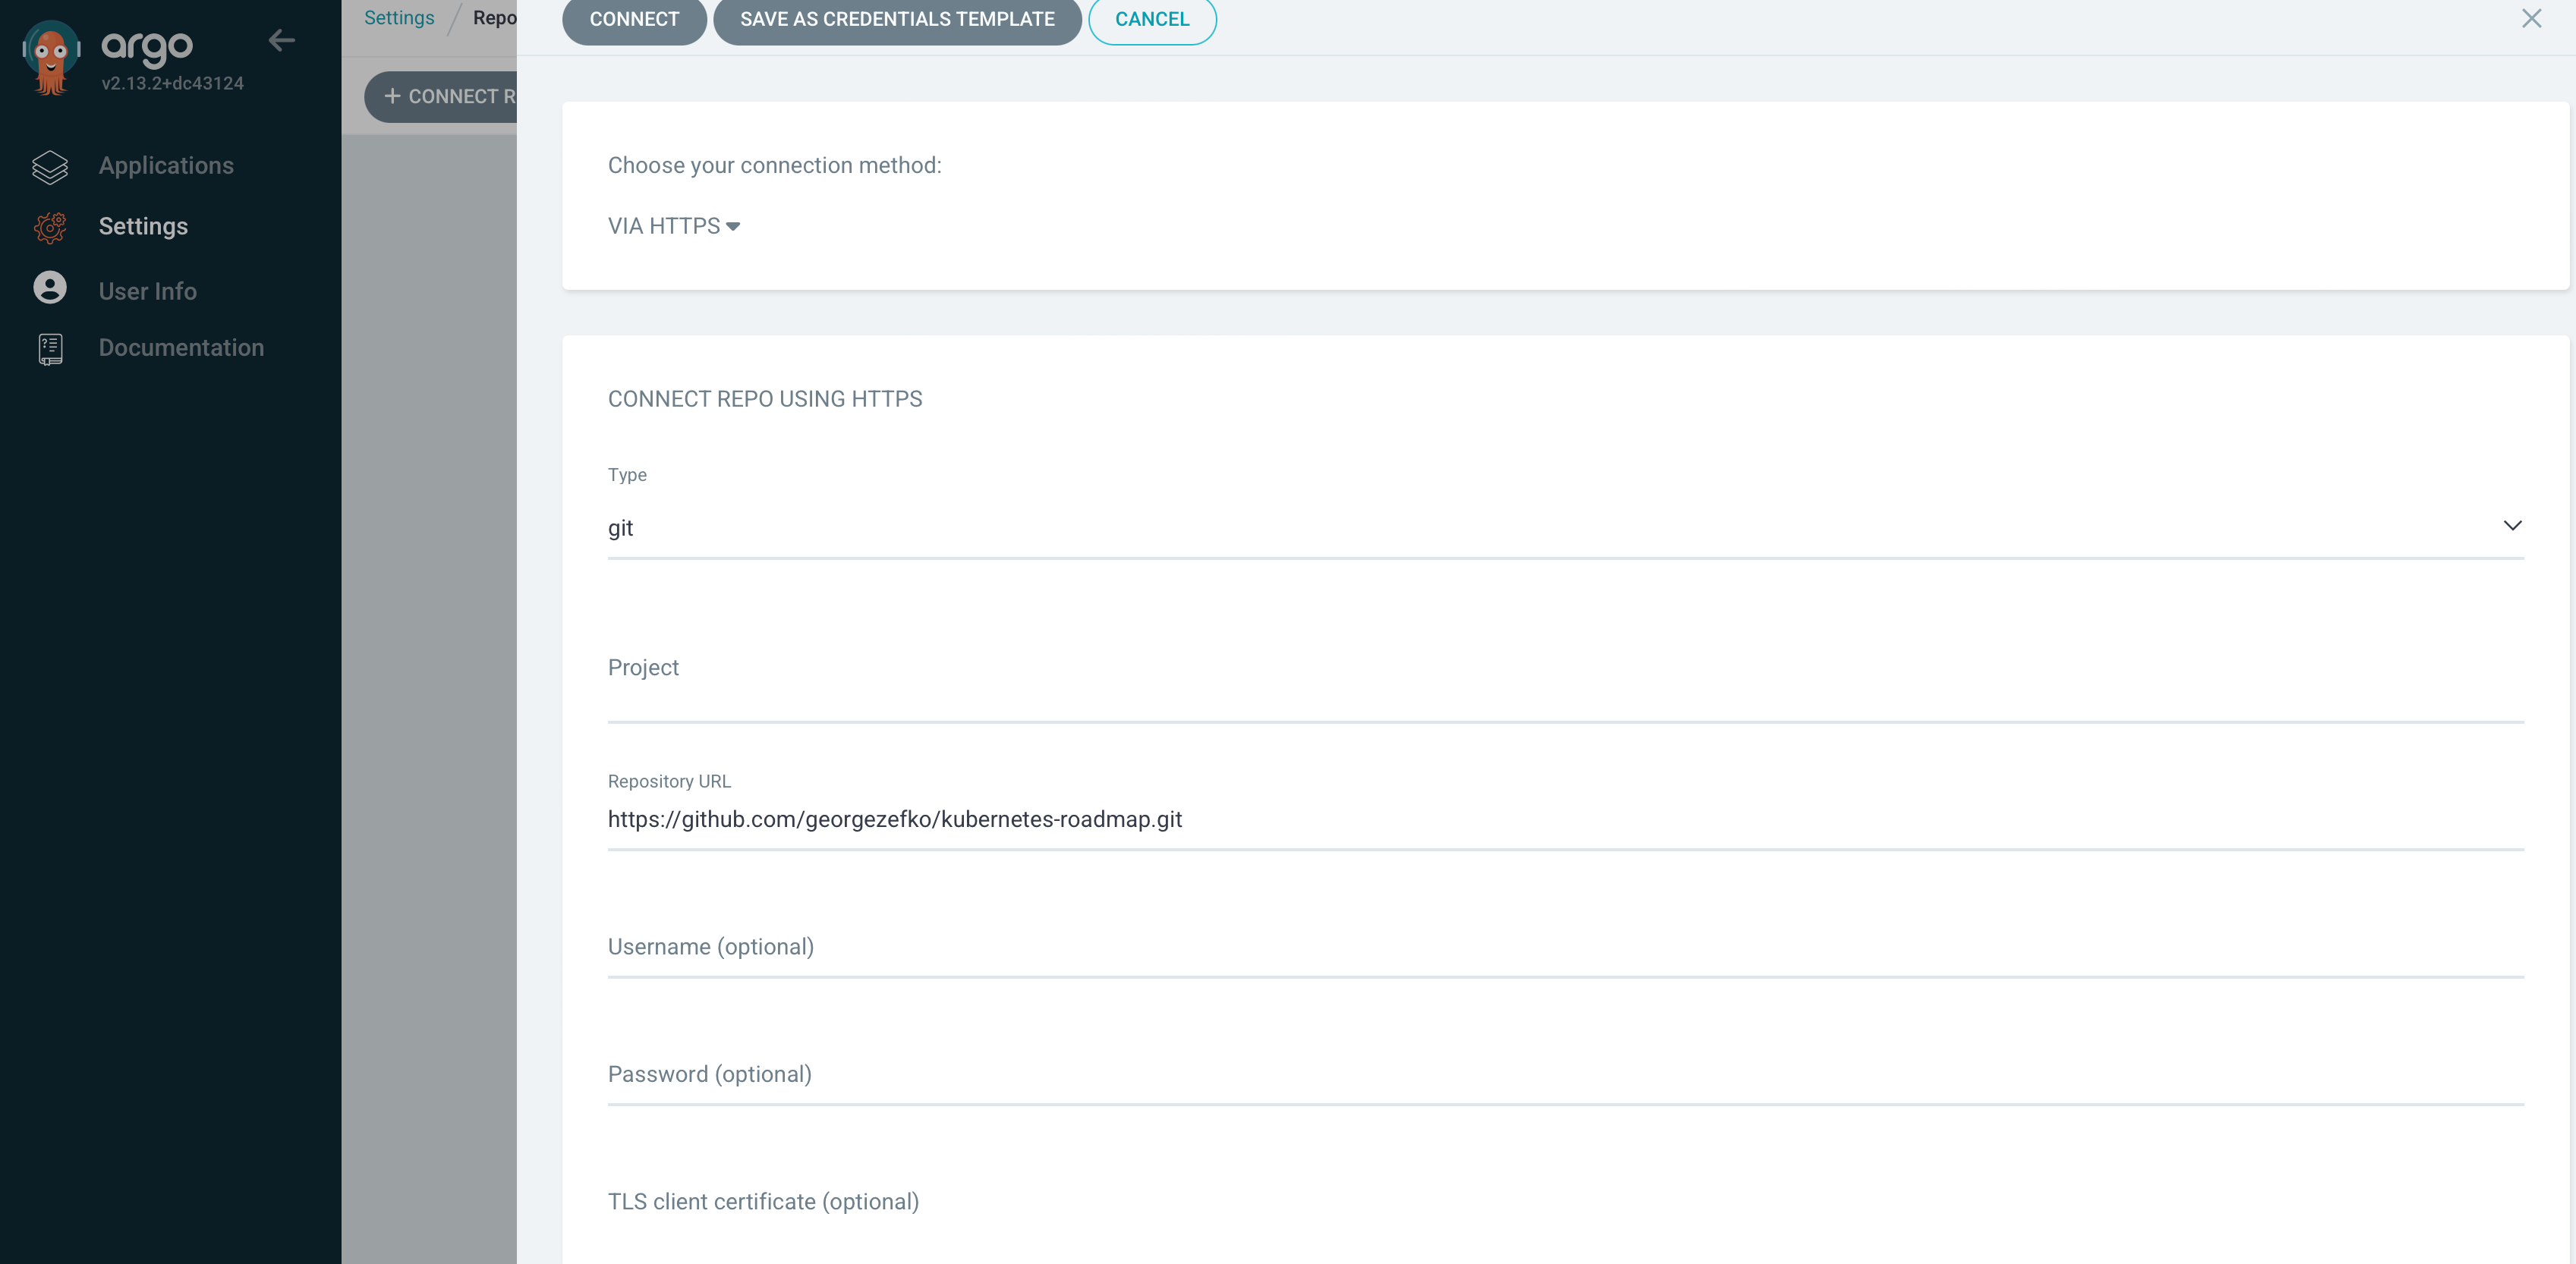
Then click the “Connect Repo” button at the top left of the Repositories page and should show the following window where you choose your connection method (HTTPS for this tutorial) and then you pass the repository URL. Leave the rest blank for the sake of simplicity. Finally click connect.
Then you should see the following.

With the repository configured, we can now create and deploy applications by defining them in our Git repository and linking them through Argo CD.
🚀 Deploying Mage-AI with Argo CD
The first application we’ll deploy using Argo CD is Mage AI, our data pipeline orchestration tool featured in previous posts. Mage AI lets you create, schedule, and manage data pipelines, making it especially helpful for handling complex workflows in an intuitive way.
📂 Repository Structure Overview
Our repository has two primary directories relevant to deployments:
appsDirectory:Contains the deployment manifests (e.g.,
Deployment,Service,Ingress) and configuration for each application. Typically split into:base: Contains the core manifests shared across all environments (e.g.,deployment.yaml,service.yaml).dev(or other environment names) – Overlays that modify the base manifests (e.g., different resource limits or environment variables)
Example structure for the
appsdirectory:
apps/
└── app/
    ├── base/
    │   ├── deployment.yaml
    │   ├── service.yaml
    │   └── kustomization.yaml
    ├── dev/
│ └── kustomization.yaml argo-appsDirectory:Holds Argo CD application definitions. These
.yamlfiles tell Argo CD how to create and manage each application by pointing to the appropriate path in theapps/directory.Example structure for the
argo-appsdirectory:
argo-apps/
├── mage-application.yaml
└── ...
In this example, mage-application.yaml is the Argo CD Application resource referencing the Mage AI manifests in apps/mage-ai/.
🛠️ Deploying Mage AI with Argo CD (Kustomize-Only)
Step 1: Create or Verify Namespace
If you haven’t already, create the develop namespace (or any namespace of your choice):
kubectl create namespace developStep 2: Define the Deployment Configuration
In apps/mage-ai-no-helm/base/deployment.yaml, add:
apiVersion: apps/v1
kind: Deployment
metadata:
  name: mageai
  namespace: develop
  labels:
    app: mageai
spec:
  replicas: 1
  selector:
    matchLabels:
      app: mageai
  template:
    metadata:
      labels:
        app: mageai
    spec:
      imagePullSecrets:
        - name: regcred
      containers:
        - name: mageai
          image: docker.io/zefko/mage_projects:1.1.4
          imagePullPolicy: IfNotPresent
          ports:
            - containerPort: 6789
          livenessProbe:
            httpGet:
              path: /api/status
              port: 6789
            initialDelaySeconds: 5
            timeoutSeconds: 10
          readinessProbe:
            httpGet:
              path: /api/status
              port: 6789
            initialDelaySeconds: 5
            timeoutSeconds: 1
We’re using the Docker image built via our CI pipeline (semantic versioning, etc.). Update the image: field if you have a different repository or tag.
Note: This is a basic deployment, for production environments we need to set resources limits, persistent volume claims and a secure way to pass secrets
Step 3: Configure Docker Registry Secrets
If your image is in a private registry, Kubernetes needs credentials to pull it. Name your secret regcred to match the Deployment above.
Docker Hub:
kubectl create secret docker-registry regcred \
  --docker-server=https://index.docker.io/v1/ \
  --docker-username=your-dockerhub-username \
  --docker-password=your-dockerhub-password \
  --docker-email=your-email@example.com \
  --namespace=develop
GitHub Container Registry:
kubectl create secret docker-registry regcred \
  --docker-server=ghcr.io \
  --docker-username=your-github-username \
  --docker-password=your-personal-access-token \
  --docker-email=your-email@example.com \
  --namespace=develop
Make sure the secret name (regcred) matches the imagePullSecrets in the Deployment spec.
Step 4: Define the Kubernetes Service
In apps/mage-ai-no-helm/base/service.yaml, define how to access your deployment internally:
apiVersion: v1
kind: Service
metadata:
  name: mageai
  namespace: develop
  labels:
    app: mageai
spec:
  type: ClusterIP
  ports:
    - port: 6789
      targetPort: 6789
      protocol: TCP
      name: http
  selector:
    app: mageai
ClusterIP means the service is only reachable within the cluster. If you need external access, consider changing this to NodePort or LoadBalancer.
Step 5: Set Up an Ingress for UI Access
In apps/mage-ai-no-helm/base/ingress.yaml, create an Ingress resource for Mage AI’s UI:
apiVersion: networking.k8s.io/v1
kind: Ingress
metadata:
  name: mageai-ingress
  namespace: develop
  annotations:
    nginx.ingress.kubernetes.io/rewrite-target: /
    kubernetes.io/ingress.class: "nginx"
spec:
  ingressClassName: nginx
  rules:
    - host: mage.dev.com
      http:
        paths:
          - path: /
            pathType: Prefix
            backend:
              service:
                name: mageai
                port:
                  number: 6789
  tls: []  # If you want TLS, specify hosts and secretName here
For local development, add 127.0.0.1 mage.dev.com to

If you’d like TLS, you can create a self-signed cert/secret as we did for Argo CD.
Step 6: Organize with Kustomize
In apps/mage-ai-no-helm/base/kustomization.yaml:
resources:
  - deployment.yaml
  - service.yaml
  - ingress.yaml
In apps/mage-ai-no-helm/dev/kustomization.yaml:
resources:
  - ../base
Step 7: Add the Mage AI Application to Argo CD
Create argo-apps/mage-no-helm-application.yaml:
apiVersion: argoproj.io/v1alpha1
kind: Application
metadata:
  name: mageai
  namespace: argocd
spec:
  project: default
  source:
    repoURL: 'https://github.com/<your-repo>/kubernetes-roadmap.git'
    targetRevision: HEAD
    path: apps/mage-ai/dev
  destination:
    server: 'https://kubernetes.default.svc'
    namespace: develop
  syncPolicy:
    automated:
      prune: true
      selfHeal: true
Finally, apply it:
kubectl apply -f argo-apps/mage-no-helm-application.yamlArgo CD will sync automatically. In the Argo CD UI, you should see the mageai application.
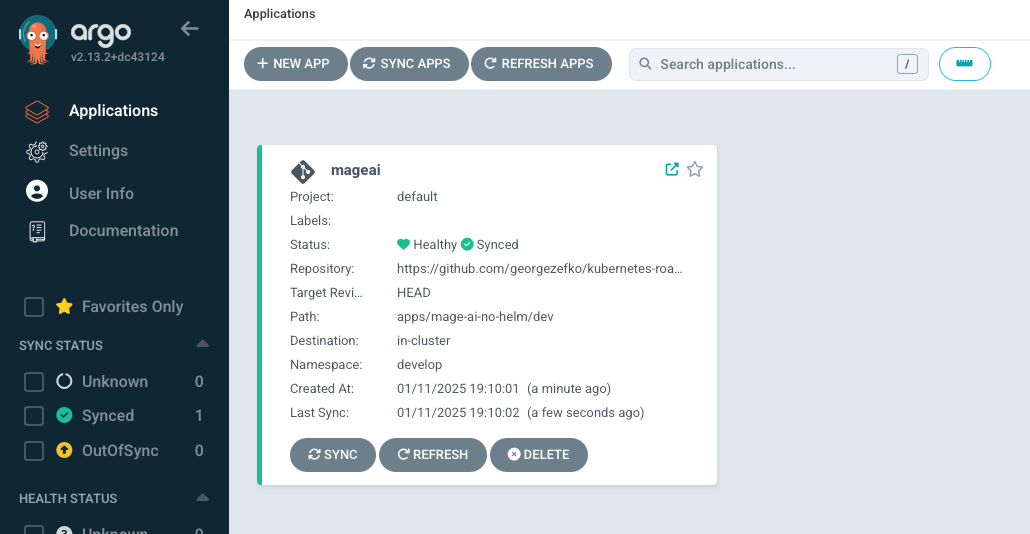
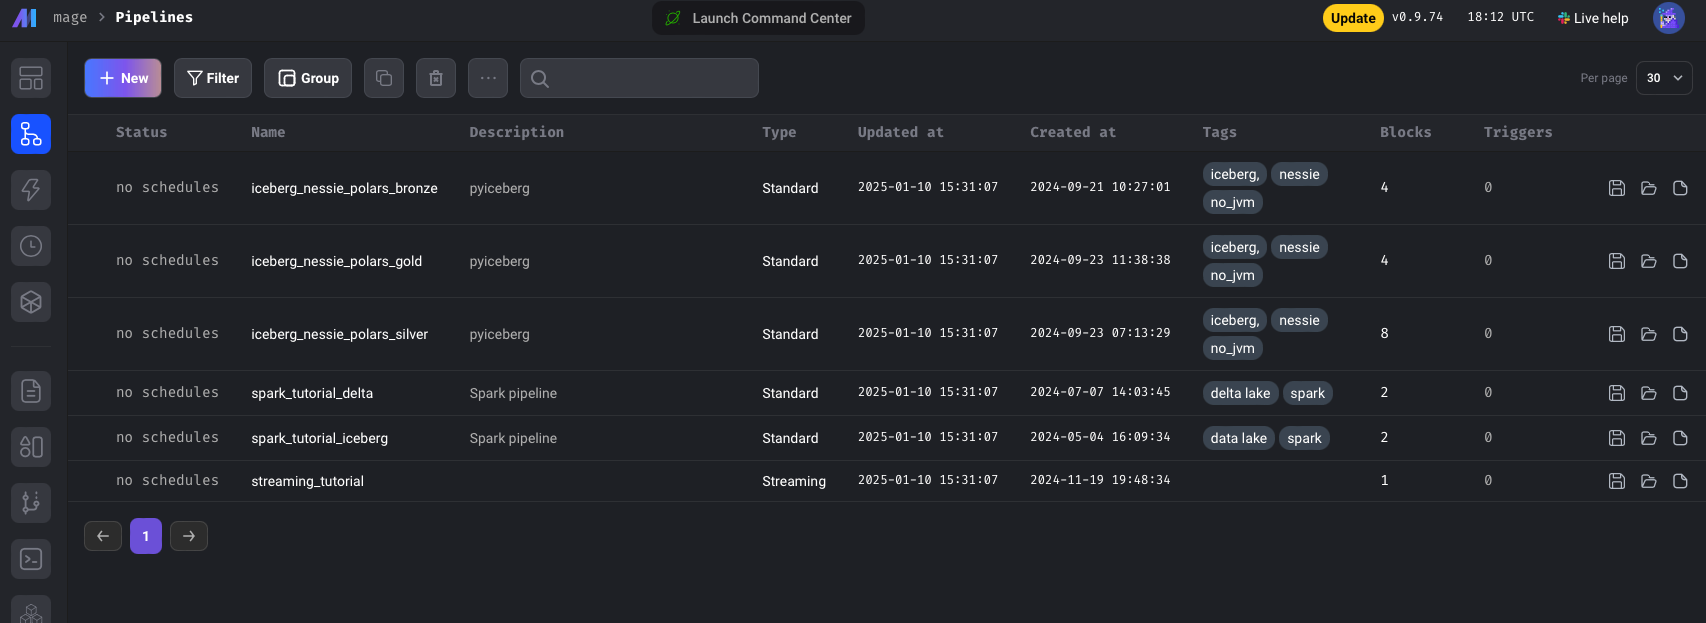
Navigate to http://mage.dev.com/pipelines (or https:// if TLS enabled) to see the Mage UI. If you used the same repo from previous tutorials, you’ll see your sample pipelines there.
For an alternative approach, we can use Mage AI’s official Helm chart. This can simplify deployments if you prefer a chart-based workflow.
🛠️ Deploying Mage AI with Argo CD (Helm)
Here’s a step-by-step summary of how to install Mage AI using Helm and prepare it for deployment with Argo CD
Add the Mage AI Helm Repository
First, add the official Mage AI Helm repository to your local Helm client:
helm repo add mageai https://mage-ai.github.io/helm-charts
helm repo update
Install Mage AI Helm Chart
A quick install with defaults:
helm install my-mageai mageai/mageaiThis deploys Mage AI with default settings (e.g., no custom domain or TLS). You can also specify a version:
helm install my-mageai mageai/mageai --version <chart-version>Pull the Chart Locally for Customization
helm pull mageai/mageai --untarThis downloads the chart into a local directory (e.g., mageai/). Edit the values.yaml to customize:
Docker image (
image.repository,image.tag)Ingress settings
Note: Because the value.yaml is very long to add here you can check it out in the GitOps repository
Configure Argo CD for the Helm Chart
Create an Argo CD Application referencing the Helm chart. For example, argo-apps/mage-helm-application.yaml:
apiVersion: argoproj.io/v1alpha1
kind: Application
metadata:
  name: mage-helm
  namespace: argocd
spec:
  project: default
  source:
    repoURL: 'https://github.com/<your-repo>/kubernetes-roadmap.git'
    targetRevision: HEAD
    path: apps/mage-ai-helm/dev
    helm:
      valueFiles:
        # Path to your custom values (could be local or a raw GitHub URL)
        - values.yaml
  destination:
    server: 'https://kubernetes.default.svc'
    namespace: develop
  syncPolicy:
    automated:
      prune: true
      selfHeal: true
Apply it:
kubectl apply -f argo-apps/mage-helm-application.yamlArgo CD will deploy Mage AI using the Helm chart. Any updates to values.yaml or the chart will trigger a resync in Argo CD, aligning your cluster state to the Git repo.
Conclusion
In this post, we:
Set up Kind for a lightweight local Kubernetes environment.
Leveraged Argo CD to automate deployments using a GitOps approach.
Deployed Mage AI with both Kustomize and Helm**, showcasing flexible configurations.
By concluding this series, we’ve established a foundational end-to-end CI/CD pipeline, taking our Docker images from build to automated syncing in Kubernetes.
Disclaimer: I’m not a DevOps engineer, and we’ve only scratched the surface of what Kubernetes can do. Consider this a quick-start guide that you can expand and improve upon.
Next, we’ll deploy Postgres, Kafka, and more to build a full-fledged data pipeline in Kubernetes. Stay tuned—happy deploying!