


DevOps for Data Engineers Part 1
Setting Up CI/CD Pipelines with Docker, Semantic Release, and Trunk-Based Development.


Hey again, fellow tech enthusiasts!
The rapid advancement of technology over the years has significantly impacted tech roles and their respective responsibilities. For example, a few years back, being a data engineer was more about data modeling, ETL, database administration, etc.
While these tasks are still part of a data engineer's job, they now often overlap with the work of analytics engineers. Additionally, data engineers share responsibilities with software engineers, focusing more on building CI/CD pipelines and setting up robust data infrastructure that efficiently runs data pipelines, queries, and more.
From my personal experience over the last couple of years, I have been involved in processes where I had to build CI/CD pipelines for data applications, as well as deploy and maintain those applications in Kubernetes (K8s) or the cloud.
In this post, I want to share what I have learned in the process—from building CI/CD pipelines at the application level to, in upcoming parts, how to set up and deploy on K8s.
Without further ado, let's dive into action!
Disclaimer: The concepts below is how I have seen them applied in the industry and most likely there different ways to use them depending on the size of the team, the business needs, skillset etc..
Theoretical Background
Below, I will provide a brief overview of a few necessary concepts required to build good CI/CD pipelines and ensure smooth collaboration with developers during development and release processes.
Trunk Based Development
One of the first things I learned was how developers collaborate on code using a single branch called the trunk (usually the main or master branch). The key characteristics include:
Single Primary Branch: Development happens primarily on the trunk (main branch).
Short-Lived Feature Branches: If branches are used, they are short-lived and merged back into the trunk quickly.
Continuous Integration: Developers integrate small, frequent updates directly into the trunk, reducing merge conflicts.
Automated Testing and Deployment: Emphasis on automation to ensure code quality and quick delivery.
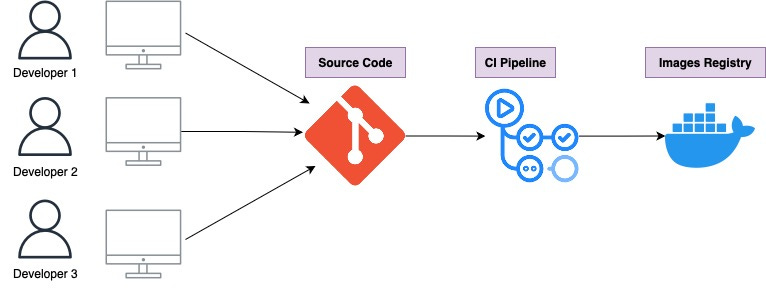
The picture below shows how trunk based development look like at scale

Depending your team’s requirement more branches might be involved but the core principal remains the same.
Semantic Versioning
Semantic Versioning is another concept I learned, which helps in versioning one's code based on how major or minor the changes are. It uses a version numbering system in the format of MAJOR.MINOR.PATCH:
MAJOR Version: Increment the MAJOR version when you make changes that are not backward-compatible. This means the new version might break or alter existing functionality in a way that could cause issues for users relying on previous versions. Examples include:
Removing or renaming existing functions, classes, or modules.
Changing the behavior of a function in a way that alters its expected output.
Modifying data formats or protocols that existing users depend on.
Essentially, a MAJOR version change signals to users that they may need to modify their own code or usage to work with the new version.
MINOR Version: Increment the MINOR version when you add new functionality in a backward-compatible manner. This includes:
Adding new functions, classes, or modules without changing existing ones.
Enhancing existing features without altering their core behavior.
Introducing new options or parameters that are optional.
Users can upgrade to the new MINOR version without worrying about their existing code breaking.
PATCH Version: Increment the PATCH version when you make backward-compatible bug fixes. These are small changes that:
Fix errors or bugs in the code.
Improve performance without changing external behavior.
Update documentation or comments.
PATCH updates are safe for users to apply immediately, as they do not affect existing functionality.
This system is very useful because, by checking the evolution of versions, one can understand whether updates involve minor fixes, the release of new features, or significant changes that might affect compatibility.
Conventional Commits
Another important concept I learned is Conventional Commits, which is a specification for formatting commit messages in a consistent and meaningful way. This convention provides a set of rules for creating an explicit commit history, making it easier to automate the generation of release notes and determine the impact of changes.
A Conventional Commit message has the following structure:
<type>[optional scope]: <description> [optional body] [optional footer(s)]Type: Specifies the nature of the change. Common types include:
feat: A new featurefix: A bug fixdocs: Documentation only changesstyle: Changes that do not affect the meaning of the code (white-space, formatting, missing semi-colons, etc.)refactor: A code change that neither fixes a bug nor adds a featureperf: A code change that improves performancetest: Adding missing tests or correcting existing testschore: Changes to the build process or auxiliary tools and libraries such as documentation generation
Scope (optional): A noun describing a section of the codebase affected (e.g.,
parser,api,router).Description: A short summary of the change in the imperative mood (e.g., "fix login button alignment").
Example Commit Messages:
feat(auth): add OAuth2 login supportfix(api): correct error handling in user endpointdocs: update README with setup instructions
Connecting Conventional Commits to Semantic Versioning
The Conventional Commits specification directly complements Semantic Versioning by providing a standardized way to communicate the nature of changes made to the codebase. Here's how they connect:
Patch Version (
PATCH):Incremented when
fixcommits are made.Represents backward-compatible bug fixes.
Example:
fix(auth): handle null pointer exception in login
Minor Version (
MINOR):Incremented when
featcommits are introduced.Represents backward-compatible new features.
Example:
feat(notification): add email alerts for new messages
Major Version (
MAJOR):Incremented when a commit includes a
BREAKING CHANGE, regardless of type.Represents incompatible API changes.
Indicated by adding
!after the type or including aBREAKING CHANGEfooter.Example:
Commit message with exclamation mark:
feat!: overhaul authentication mechanism to use JWTCommit message with
BREAKING CHANGEfooter:refactor(auth): replace session tokens with JWT BREAKING CHANGE: Users will be logged out and need to log in again due to the new authentication mechanism.
By following Conventional Commits, you enable tooling to automatically determine the appropriate Semantic Versioning bump based on the types of commits in a release. This automation ensures that version numbers accurately reflect the nature of the changes, providing clear communication to users about the impact of updating to a new version.
Adopting Conventional Commits along with Semantic Versioning creates a robust framework for managing code changes, versioning, and communication within your development workflow. It streamlines the release process and helps maintain a high level of code quality and project organization.
Build the workflows
In this first part, we focus on developing the Continuous Integration (CI) flow (I call this part CI/CD in the rest of the article). In the next part, I will demonstrate how to implement Continuous Delivery (CD) of the generated artifacts to deploy on Kubernetes.
Configure Semantic Versioning
For demonstration purposes, I will use the repository from previous posts that contains the data pipelines .
Since we will apply Semantic Versioning, we need to add some configuration so our release pipelines know what version to assign to the artifact. Therefore, the first step is to create a .releaserc file in the root directory of our project. This file configures semantic-release, a tool that automates the release workflow.
You can also use python-semantic-release package as well which requires a bit different set up. I use
.releasercbecause I am more familiar with it.
Here's what the .releaserc file should contain:
{
  "plugins": [
    "@semantic-release/commit-analyzer",
    "@semantic-release/release-notes-generator",
    [
      "@semantic-release/changelog",
      {
        "changelogFile": "CHANGELOG.md"
      }
    ],
    ["@semantic-release/exec", {
      "failCmd": "echo ${version} > /tmp/version",
      "prepareCmd": "echo ${nextRelease.version} > /tmp/version",
      "shell": "/bin/bash"
    }],
    ["@semantic-release/git", {
      "assets": ["CHANGELOG.md"],
      "message": "chore(release): ${nextRelease.version} [skip ci] \n\n${nextRelease.notes}"
    }]
  ],
  "tagFormat": "v${version}",
  "branches": [
    "main",
    {
      "name": "release/*",
      "prerelease": "${name.replace(/^release\\//g, '')}"
    }
  ]
}
Let’s see what do these components mean.
Plugins: This section lists the plugins used by
semantic-releaseto automate the release process:@semantic-release/commit-analyzer: Analyzes commit messages to determine the next version bump (major, minor, or patch) based on the Conventional Commits specification.@semantic-release/release-notes-generator: Generates release notes from commit messages.@semantic-release/changelog: Updates theCHANGELOG.mdfile with the new release notes.@semantic-release/exec: Runs custom shell commands during the release process. In this case, it outputs the version number to/tmp/version.@semantic-release/git: Commits the updatedCHANGELOG.mdback to the repository with a commit message
tagFormat: Defines the format of the Git tag for each release, using the version number (e.g.,
v1.2.3).Branches: Specifies which branches to release from:
"main": Releases will be made from themainbranch.Release branches matching
"release/*": Allows for pre-releases from branches likerelease/beta.
By setting up the .releaserc file, we enable semantic-release to automate our project's release workflow. It ensures consistent versioning, generates helpful release notes, and updates relevant files automatically. This setup streamlines the release process and maintains a clear project history.
Build Github Workflows
Pre Merge
Next, we'll build the pipelines that will test our code, build, version, and push our code to the registry, which we can then use to deploy to a Kubernetes (K8s) platform (more about that in a later post). The first thing to do is to create a folder named .github in the root directory, and inside it, a folder called workflows. Then we can build our pipelines.
The first pipeline I call preMerge, and this is where I run the tests (for more comprehensive automated tests might require different approach). The pipeline looks like this
name: Pre-Merge Tests

on:
  pull_request:
    branches:
      - '**'  # Only trigger on pull requests to any branch
  push:
    branches-ignore:
      - main  # Ignore pushes to main to avoid duplicate runs
      - 'release/*'  # Ignore pushes to release branches, so it only runs on PRs

concurrency:
  group: pre-merge-${{ github.ref }}
  cancel-in-progress: true
jobs:
  test:
    runs-on: ubuntu-latest

    steps:
      - name: Checkout code
        uses: actions/checkout@v3

      - name: Set up Python
        uses: actions/setup-python@v4
        with:
          python-version: '3.9'  # Specify the Python version you need

      - name: Install dependencies
        run: |
          python -m pip install --upgrade pip setuptools wheel
          pip install --prefer-binary -r mage/requirements.txt

      - name: Run unit tests
        run: make unit-tests # full command in Makefile
In this pipeline, we set up a GitHub Actions workflow named Pre-Merge Tests that runs unit tests on our code whenever a pull request is opened or updated, or when code is pushed to any branch except main and release/* branches. This helps catch issues before code is merged into the main branch.
Key Points:
Triggering Events:
pull_request: Runs on pull requests to any branch.push: Runs on pushes to any branch exceptmainandrelease/*. Ignoringmainandrelease/*prevents duplicate runs when pull requests are merged.
Concurrency:
Ensures that if multiple runs are triggered on the same branch, only the latest one runs, and previous ones are cancelled.
Jobs:
The
testjob runs onubuntu-latestand includes steps to:Checkout code: Uses the
actions/checkoutaction to clone the repositorySet up Python: Uses
actions/setup-pythonto specify the Python version.Install dependencies: Upgrades
pip,setuptools, andwheel, and installs dependencies fromrequirements.txt(I used wheel and setup tools due to some errors I had with pyiceberg - in general they are not necessary).Run unit tests: Executes
make unit-tests, which runs the unit tests as defined in theMakefile(check the repo for details).
Continuous Integration
Lastly, we have our CI/CD pipeline (in the repo I call it build and deploy) that will run when a pull request is merged into the main or release branch. This pipeline will containerize our code using Docker and publish it to a Docker registry.
Note: I call it CI/CD pipeline because potentially we could deploy directly from there. However, in this post I only use it for continuous integration.
Here is what the pipeline looks like:
name: CI/CD Pipeline

on:
  push:
    branches:
      - main
      - 'release/*'

jobs:
  build-and-push:
    runs-on: ubuntu-latest
    if: github.event_name != 'pull_request'

    env:
      DOCKERHUB_REPO: zefko/mage_projects   # Replace with your Docker Hub repo name
      IMAGE_NAME: mage_projects  # Use the same image name for GHCR
      REGISTRY: ghcr.io
      IMAGE_URL: ${{ github.repository }}  # This will be in the format 'username/repo'

    steps:
      - name: Checkout Code
        uses: actions/checkout@v3

      - name: Set up Node.js
        uses: actions/setup-node@v3
        with:
          node-version: '18.15'

      - name: Release Setup
        run: |
          npx -y -p @semantic-release/git \
                 -p @semantic-release/changelog \
                 -p @semantic-release/exec \
                 -p semantic-release@19 \
                 semantic-release
        env:
          GITHUB_TOKEN: ${{ secrets.GITHUB_TOKEN }}

      - name: Set Release Variable
        id: set_release
        run: |
          if [ -f /tmp/version ]; then
            RELEASE=$(cat /tmp/version | tr -d '[:space:]')
          else
            RELEASE=${{ github.run_number }}
          fi
          echo "RELEASE=$RELEASE" >> $GITHUB_ENV
          echo "This is your release tag! $RELEASE"

      - name: Debug Variables
        run: |
          echo "DOCKERHUB_REPO: '$DOCKERHUB_REPO'"
          echo "RELEASE: '$RELEASE'"
          echo "IMAGE_URL: '$IMAGE_URL'"

      - name: Log in to Docker Hub
        uses: docker/login-action@v2
        with:
          username: ${{ secrets.DOCKER_HUB_USERNAME }}
          password: ${{ secrets.DOCKER_HUB_PASSWORD }}

      - name: Log in to GitHub Container Registry
        uses: docker/login-action@v2
        with:
          registry: ${{ env.REGISTRY }}
          username: ${{ github.actor }}
          password: ${{ secrets.GITHUB_TOKEN }}

      - name: Build Docker Image
        run: |
          # Build the Docker image
          docker build -t $DOCKERHUB_REPO:${RELEASE} .

          # Tag the image for GitHub Container Registry
          docker tag $DOCKERHUB_REPO:${RELEASE} ${{ env.REGISTRY }}/${{ env.IMAGE_URL }}:${RELEASE}

      - name: Push Docker Image to Docker Hub
        run: |
          docker push $DOCKERHUB_REPO:${RELEASE}

      - name: Push Docker Image to GitHub Container Registry
        run: |
          docker push ${{ env.REGISTRY }}/${{ env.IMAGE_URL }}:${RELEASE}
Explanation of the Pipeline:
In this GitHub Actions workflow named CI/CD Pipeline, we automate the build of our application when code is merged into the main or any release/* branch.
Note: The pipeline aims to register the docker artifact on my personal docker registry and GitHub registry. You don’t need both. Github registry should be enough and you can remove the lines referred to the other one.
Triggers:
on.push.branches:
The workflow triggers on pushes to the
mainbranch and any branches matchingrelease/*.This ensures the pipeline runs when changes are merged into these branches.
Job: build-and-push
runs-on: The job runs on
ubuntu-latest.if: The job runs only if the event is not a
pull_request, preventing it from running during pull request events.
Environment Variables:
DOCKERHUB_REPO: Your Docker Hub repository name (e.g.,
zefko/mage_projects). Replace this with your actual Docker Hub repository.IMAGE_NAME: The image name used for the GitHub Container Registry (GHCR).
REGISTRY: The registry domain (
ghcr.iofor GitHub Container Registry).IMAGE_URL: The GitHub repository path, used for image tagging (formatted as
username/repo).
Steps:
Checkout Code:
Uses
actions/checkout@v3to clone the repository.
Set up Node.js:
Uses
actions/setup-node@v3to set up Node.js version18.15, which is required for runningsemantic-release.
Release Setup:
Runs
semantic-releasewith necessary plugins to automate versioning based on commit messages.This step updates the version number and generates release notes.
The
GITHUB_TOKENis used for authentication.
Set Release Variable:
Checks if a version file exists (
/tmp/version) created bysemantic-release.Sets the
RELEASEvariable to the version fromsemantic-releaseor falls back to the GitHub run number.Exports the
RELEASEvariable to the GitHub Actions environment for use in subsequent steps.
Debug Variables:
Prints out the values of key environment variables (
DOCKERHUB_REPO,RELEASE,IMAGE_URL) for debugging purposes (this step can be skipped I just used due to error I had on the variables).
Log in to Docker Hub:
Uses
docker/login-action@v2to authenticate with Docker Hub.Credentials (
DOCKER_HUB_USERNAMEandDOCKER_HUB_PASSWORD) are securely stored in GitHub Secrets.
Log in to GitHub Container Registry:
Authenticates with the GitHub Container Registry using the
GITHUB_TOKEN.
Build Docker Image:
Builds the Docker image and tags it with the
RELEASEversion for Docker Hub.Tags the same image for GitHub Container Registry.
Push Docker Image to Docker Hub:
Pushes the Docker image to your Docker Hub repository.
Push Docker Image to GitHub Container Registry:
Pushes the Docker image to the GitHub Container Registry.
Demonstration
Let's see how versioning works with a real example. We'll create a feature branch to add a new streaming data pipeline to our project.
Starting from the main branch, we create a new branch for our new feature:
git checkout -b feat/addStreamingPipelineIn this new branch, we develop a streaming pipeline. You can implement any pipeline you like; in my case, I'll use this pipeline in a later post. Additionally, we update the docker-compose.yaml file to include Kafka-related services necessary for streaming.
After completing our changes, it's time to commit them. This is where Semantic Versioning and Conventional Commits come into play. We stage all the changes and commit with a message that follows the Conventional Commits format:
git add . # to add the changes
git commit -m "feat(streaming): added pipeline and updated docker compose"
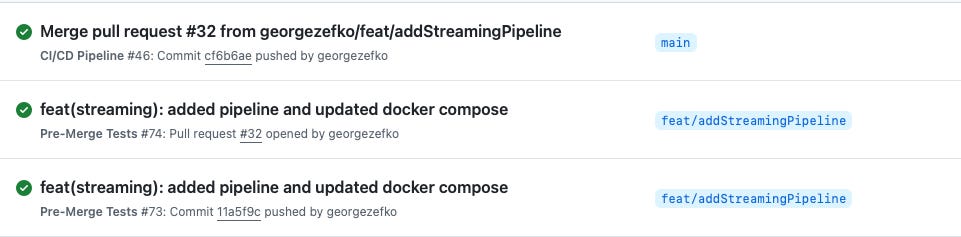
git pushThe commit message starts with feat, indicating that we've added a new feature. The scope (streaming) specifies the area of the codebase affected. This structured message allows our release pipeline to determine the appropriate version bump automatically.
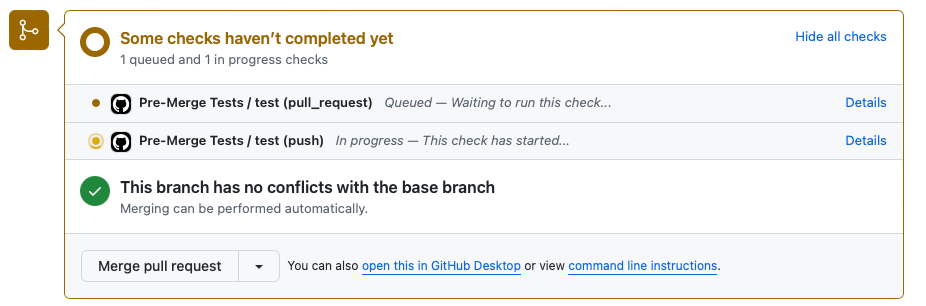
Next, we open a pull request to merge our feature branch into main. Our preMerge.yaml pipeline is triggered, running all the tests to ensure our new code doesn't introduce any issues. If we push additional commits to this branch, the pipeline will rerun, providing continuous feedback during the review process.
Once the pull request passes all checks and is approved, we merge it into the main branch. Upon merging, the CI/CD pipeline is triggered. This pipeline handles versioning, builds the Docker image, and pushes it to our Docker registry.
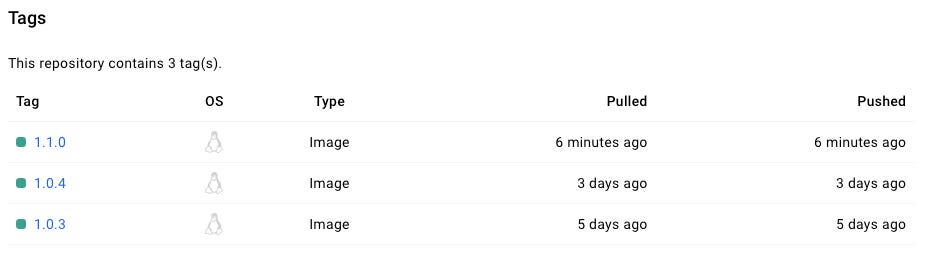
Because our commit message was categorized as a feat, Semantic Versioning increments the minor version of our application. If the previous version was 1.0.4, the new version becomes 1.1.0.
The pipeline updates the CHANGELOG.md file automatically, reflecting the new changes:
# [1.1.0](https://github.com/georgezefko/mage_projects/compare/v1.0.4...v1.1.0) (2024-11-19)


### Features

* **streaming:** added pipeline and updated docker compose ([11a5f9c](https://github.com/georgezefko/mage_projects/commit/11a5f9c5e8b97b2ed1642d1e196d82db3d5947c1))
This process ensures that everyone is aware of the changes and their impact. The updated version tag is visible on GitHub and in Docker Hub, providing clarity on the state of the application.
Then you can use that tag to release your application on Kubernetes.
Handling Hotfixes on Previous Versions
There might be situations where the latest version isn't ready for production, but you need to apply a critical fix to a previous stable version. In such cases, you can create a release branch from the specific version tag:
git checkout -b release/dummyFix v1.0.4in this new branch, you apply the necessary fixes. For example, let's say we have a smallest yet critical fix to apply:
# Make your code changes for the fix
git add .  # Stage changes
git commit -m "fix(iceberg): corrected types"
git push origin release/release-v1.0.4
The commit message uses fix, indicating a bug fix, which will trigger a patch version bump when the pipeline runs. After opening and merging a pull request for this branch, the CI/CD pipeline increments the version to 1.0.5-dummyFix.1, updates the CHANGELOG.md, and pushes the new Docker image.
By following this workflow, we maintain clear versioning and ensure that our production environment receives critical updates without incorporating untested features from newer versions.
Note: We don't merge the release branch back into
main. Ideally, when we create a release branch, we create feature (feat/) and fix (fix/) branches from the release branch and merge back into it. This approach allows us to manage hotfixes and features for specific versions without affecting the main development line.
Conclusion
In this article, we've explored how trunk-based development, Semantic Versioning, and Conventional Commits can be effectively integrated into a CI/CD pipeline to automate versioning, testing, and deployment.
Adopting trunk-based development streamlines collaboration by having developers work primarily on a single branch (the trunk) with short-lived feature branches that are quickly merged back. This approach reduces merge conflicts and ensures continuous integration, leading to a more efficient development process.
By structuring our commit messages according to the Conventional Commits specification and leveraging tools like semantic-release, we ensure that version numbers accurately reflect the nature of changes—whether they're new features, bug fixes, or breaking changes. This not only automates the release process but also maintains a clear and updated project history through automatic updates to the CHANGELOG.md and version tags.
While setting up CI/CD pipelines might not be the most thrilling aspect of data engineering , it's an essential part of ensuring projects run successfully and facilitating smooth collaboration among developers. I hope you found this information useful.
In the next posts, I will show you how to deploy the Docker artifacts and the new streaming pipeline on Kubernetes. Stay tuned!
References
Automating Semantic Versioning with Github Actions and Branch Naming Conventions