


Automating Databricks Deployments: CI/CD with Asset Bundles and Semantic Release


Hey again, fellow tech enthusiasts!
Since I first started using Databricks, I had a recurring concern: how can we properly apply CI/CD in a data platform context? Early on, I struggled to understand how to build a robust and repeatable deployment pipeline. It turns out, there are several approaches — and one of the most promising is Databricks Asset Bundles (DABs).
Databricks Asset Bundles provide a structured way to package, version, test, and deploy Databricks resources (like notebooks, workflows, and libraries) using modern software engineering practices. They help bring consistency to development workflows and significantly simplify CI/CD processes.
In this post, I’ll walk you through how to build a CI/CD pipeline for Databricks using:
Trunk-Based Development
Semantic Versioning
Conventional Commits
We’ll use these to version our code changes, run automated tests, and safely deploy to different Databricks workspaces — all from the comfort of VS Code
Note 1. I’ve already covered the theory behind Trunk Based Development, Semantic Versioning, Conventional Commits in this premium post (or this free one), so I won’t repeat that content here.
Note 2. If you’re looking for guidance on how to set up your local development environment using Dev Containers and Databricks Asset Bundles, check out this post
Let’s dive into the details and start building a production-grade CI/CD pipeline for Databricks!
Configure Semantic Versioning
The first step is to enable Semantic Versioning using semantic-release, an automated release tool that helps manage versioning, changelogs, and tagging based on conventional commits.
To do this, create a .releaserc file in the root of your repository. This file configures how semantic-release interprets your commit messages to determine version bumps and generate release notes.
{
  "plugins": [
    "@semantic-release/commit-analyzer",
    "@semantic-release/release-notes-generator",
    [
      "@semantic-release/changelog",
      {
        "changelogFile": "CHANGELOG.md"
      }
    ],
    ["@semantic-release/exec", {
      "failCmd": "echo ${version} > /tmp/version",
      "prepareCmd": "echo ${nextRelease.version} > /tmp/version",
      "shell": "/bin/bash"
    }],
    ["@semantic-release/git", {
      "assets": ["CHANGELOG.md"],
      "message": "chore(release): ${nextRelease.version} [skip ci] \n\n${nextRelease.notes}"
    }]
  ],
  "tagFormat": "v${version}",
  "branches": [
    "main",
    {
      "name": "release/*",
      "prerelease": "${name.replace(/^release\\//g, '')}"
    }
  ]
}
By setting this up, semantic-release will:
Automatically determine the next semantic version (major/minor/patch) based on commit messages.
Update relevant files (e.g.,
CHANGELOG.md).Create GitHub releases and Git tags.
You can find detailed description of this configuration in this post.
Build Github Workflows
We now define two GitHub Actions workflows: one for development deployments and another for release tagging.
dev-deploy.yaml
Create a .github/workflows directory in your repository if it doesn’t already exist. Inside it, add a file named dev-deploy.yaml. This workflow will validate and deploy our Databricks Asset Bundle on every pull request targeting main.
name: 'Dev Deployment'

concurrency: '1'

on:
  pull_request:
    types: [opened, synchronize]
    branches:
      - main

jobs:
  validate:
    name: 'Validate Databricks Bundle'
    runs-on: ubuntu-latest

    steps:
      - uses: actions/checkout@v4

      - uses: databricks/setup-cli@main

      - name: Validate bundle
        run: databricks bundle validate
        working-directory: databricks
        env:
          DATABRICKS_HOST: ${{ secrets.DATABRICKS_HOST }}
          DATABRICKS_TOKEN: ${{ secrets.DATABRICKS_TOKEN }}
          DATABRICKS_BUNDLE_ENV: dev

  deploy:
    name: 'Deploy Databricks Bundle'
    runs-on: ubuntu-latest
    needs: validate

    steps:
      - uses: actions/checkout@v4
      - uses: databricks/setup-cli@main

      - name: Deploy bundle
        run: databricks bundle deploy
        working-directory: databricks
        env:
          DATABRICKS_HOST: ${{ secrets.DATABRICKS_HOST }}
          DATABRICKS_TOKEN: ${{ secrets.DATABRICKS_TOKEN }}
          DATABRICKS_BUNDLE_ENV: dev
The pipeline triggers on pull requests to
main.It runs in two sequential jobs:
validateanddeploy.Both jobs use secrets to securely access the Databricks workspace.
All commands are executed from the
/databricksdirectory (this is the name of our bundle) of your repo.
🔐 Security Tip: In production environments, it’s preferable to authenticate using a Service Principal rather than a personal access token (PAT). PATs are tied to a single user and may expire or be revoked. Service Principals offer better security, auditability, and scalability.
To create a PAT (if you’re just getting started and NOT on the Community plan):
Go to your Databricks workspace → Settings → Developer → Access Tokens.
Generate a token and copy it.
In your GitHub repository (not your account), go to Settings → Secrets and Variables → Actions.
Add secrets named
DATABRICKS_HOSTandDATABRICKS_TOKEN.
This setup ensures every change targeting main is validated and deployed to a dev workspace, helping catch issues early in the development lifecycle.
🧪 I haven’t included steps to trigger Databricks jobs or run tests here, since those are often scheduled or triggered via the bundle configuration itself. But you can easily add a testing step in the pipeline as needed.
release.yaml
Now let’s set up the release pipeline, which creates a versioned Git tag and updates the CHANGELOG.md automatically upon each merge to main.
name: 'Release'

on:
  push:
    branches:
      - main

jobs:
  semantic-release:
    name: 'Tag & Release'
    runs-on: ubuntu-latest

    permissions:
      contents: write  # Needed to create Git tags/releases

    steps:
      - uses: actions/checkout@v4

      - uses: actions/setup-node@v4
        with:
          node-version: '20'

      - name: Install semantic-release and plugins
        run: |
          npm install --global semantic-release \
            @semantic-release/changelog \
            @semantic-release/git \
            @semantic-release/exec \
            @semantic-release/commit-analyzer \
            @semantic-release/release-notes-generator

      - name: Run semantic-release
        env:
          GITHUB_TOKEN: ${{ secrets.GITHUB_TOKEN }}
        run: semantic-release
This workflow:
Runs on every
pushtomain.Uses
semantic-releaseto:Analyze commit messages,
Determine version bumps,
Create a GitHub release and tag,
Update
CHANGELOG.md.
Note. You might also consider to add the deploy part in the release pipeline so you avoid releasing in every pull request but only when you merge to main.
Environments & Promotion
If you need to deploy to additional environments (e.g., test, prod), consider one of these strategies:
Use environment-specific branches like
release/testorrelease/prodand trigger dedicated pipelines for each.Alternatively, consolidate into a single pipeline that dynamically targets environments based on Git tags or environment variables.
You can store workspace credentials for each environment using separate GitHub secrets (DATABRICKS_TOKEN_PROD, DATABRICKS_HOST_TEST, etc.).
As you gain experience, you can evolve the setup to support more sophisticated deployment models (e.g., gated releases, environment promotion workflows).
With both pipelines in place, our project is now equipped with a robust CI/CD system that enforces validation, automates deployments, and handles versioning with traceable changelogs. Next, let’s take a look at how all this works in practice.
Demonstration: Versioning and Deployment in Action
Let’s walk through a practical example to see Semantic Versioning and Conventional Commits work together in our CI/CD pipeline using GitHub Actions.
Create a Feature Branch
We’ll start by creating a new feature branch from main to implement a dummy feature. For example, let’s say we’re adding a new pipeline configuration.
git checkout main
git pull origin main
git checkout -b feat/dummyFeature
Apply the Changes
Now, we implement our feature — for instance, add a new workflow YAML file, modify a notebook, or update your bundle configuration. Once done, stage and commit the changes using the Conventional Commits format:
git add .
git commit -m "feat(pipelines): add dummy pipeline for demonstration"
git push origin feat/dummyFeature
The commit message format is crucial. It informs semantic-release how to determine the next version number:
feat: will trigger a minor version bump (e.g.,1.1.1→1.2.0)fix: will trigger a patch version bump (e.g.,1.1.1→1.1.2)BREAKING CHANGE: will trigger a major version bump
Open a Pull Request
Once the branch is pushed, open a pull request targeting main. This will automatically trigger the dev-deploy.yamlpipeline.
✅ What happens now:
The bundle is validated with
databricks bundle validateIf validation passes, the bundle is deployed to the dev workspace
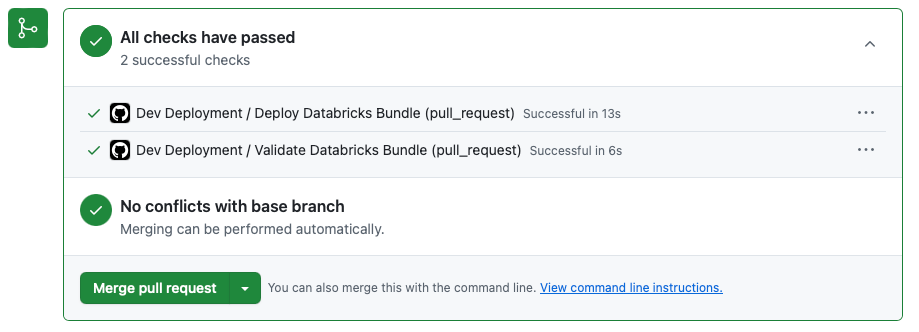
This means that the resources in our dev workspace reflect the state of the bundle from our feature branch, not the final merged state.
⚠️ Important: This may not be ideal for every team. Since deployment happens during PRs, the dev environment might temporarily contain unmerged or experimental code.
If you prefer to deploy only after changes are merged, you can move the
databricks bundle deploystep into the release pipeline (release.yaml). That way, deployment happens only once the release is tagged—ensuring that only reviewed and versioned code reaches the workspace.
This design choice depends on your team’s workflow:
Deploy on PR (current setup): Useful for fast feedback and previewing changes in the dev workspace.
Deploy on merge (alternative): Safer for teams that want to ensure only validated, merged code is deployed.
Merge the Pull Request
After reviewing and confirming everything looks good, merge the PR. If needed, you can still edit the commit message before merging to ensure it follows the conventional format (important for accurate versioning).
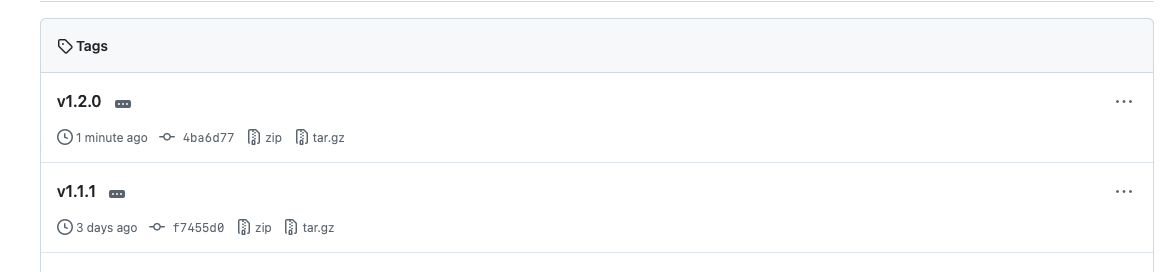
Release Pipeline Runs
Upon merging into main, the release.yaml workflow is triggered.
🚀 This pipeline will:
Analyze the commit history
Determine the next semantic version (e.g.,
1.1.1→1.2.0)Create a Git tag
Update the
CHANGELOG.mdwith the new changesCreate a GitHub Release (optional)
You can view the new version under the “Tags” section of your repository.
Verify the Updated Changelog
The CHANGELOG.md file will be automatically updated and committed with a new entry under the version tag, reflecting your latest changes.

This changelog gives your team a clear, centralized view of what features or fixes were introduced in each release, making collaboration and auditing much easier.
Now that your change is safely deployed to the dev workspace and versioned, you can promote it to test or prod by merging to environment-specific branches or triggering a dedicated deployment pipeline.
Note For more details on hotfixes, patch strategies check out this post
With this workflow, we’ve achieved a robust and automated CI/CD process that:
Enforces best practices with Conventional Commits
Ensures our Databricks bundles are tested and validated before merging
Provides visibility and traceability with semantic versioning and changelogs
Conclusion
In this post, we explored how to build a CI/CD pipeline for Databricks Asset Bundles using a combination Trunk-Based Development, Semantic Versioning, Conventional Commits.
By integrating these practices, we automated critical parts of the development lifecycle — versioning, validation, deployment, and changelog generation — creating a more maintainable and transparent workflow.
While the implementation shown here is intentionally simple, it provides a solid foundation for teams looking to adopt modern software engineering principles in their Databricks projects.
There’s plenty of room to grow — such as adding environment promotion, automated testing, or advanced deployment strategies — but this should give you a confident starting point to iterate from.
Thank you for reading my article I hope you found it insightful :)
You can find the code in the repository and feel free to connect with me on linkedin.
References
Automating Semantic Versioning with Github Actions and Branch Naming Conventions