


Building a Local Data Lake from scratch with MinIO, Iceberg, Spark, StarRocks, Mage, and Docker


Hello again, fellow technology enthusiasts! I am a software/data engineer who transitioned from data science. The learning curve in this new role has been quite steep, providing me with the opportunity to work with a plethora of new tools, languages, frameworks, and technologies.
One of the challenges I have faced is quickly developing and testing various technologies and understanding how they interact with each other. Data engineering projects, in particular, are often complex and involve multiple components to simulate an end-to-end system.
In this post, I would like to share some of these technologies and demonstrate how they work together through a small project that I use myself.
Let’s jump into it!!
The project

The project aims to demonstrate how to establish a system where you can extract, transform, and load data into a local data lake and query the data using a SQL engine.
The technologies/frameworks we will use are the following:
Docker: You may already be familiar with Docker. If not, it is a technology you must learn, as it significantly accelerates the process of building and testing applications.
Mage: Mage will be our data pipeline orchestrator for building and running our scripts. While not strictly required for this project, as a data engineer, it is essential to familiarise yourself with orchestrating pipelines, and Mage is an excellent tool for this purpose.
Spark: Spark, a popular unified analytics engine for large-scale data processing, will be used to perform basic transformations on our data.
Minio: MinIO is a high-performance, S3-compatible object store. In this project, it will serve as our data lake where we will store our data.
Apache Iceberg/Delta: Both Apache Iceberg and Delta Lake are advanced table formats that enhance data lakes with features like schema evolution, ACID transactions, and time travel. They improve data reliability, query performance, and scalability, making data lakes more efficient for large-scale analytics. In this project, I will demonstrate Iceberg.
StarRocks: StarRocks is a high-performance analytical database that supports real-time and batch data ingestion from various data sources. It allows direct analysis of data stored in data lakes with zero data migration. In our project, it will be used to query data from our data lake.
As you can see, several technologies and frameworks are required to establish a solid foundation for our data lake. While different technologies can be used, the core principles remain the same for any data engineering project.
Set up services
I will start building the project repository around Mage, as it will serve as the orchestrator and connector between our services. I like Mage for its simplicity and intuitive approach to building robust and scalable data pipelines.
Let’ start!!!
First I create an empty repository and add the following files/folders
.envMakefileDockerfiledocker-compose.yaml
In the .env file, we will store the credentials needed for our services. Fortunately, we only need two for accessing our Minio services:
MINIO_ACCESS_KEY= choose_a_key
MINIO_SECRET_KEY= choose_a_secret
Additionally, to simplify our workflow and avoid memorizing Docker and other complex commands, we will add the following Makefile to easily call them each time.
# The image name for the Docker container
IMAGE_NAME = mage_demo

# The name of the Docker Compose file
COMPOSE_FILE = docker-compose.yaml

# Build the Docker image
build:
 docker build -t $(IMAGE_NAME) .

# Run the containers in the background
up:
 docker-compose -f $(COMPOSE_FILE) up -d

# Stop the containers
down:
 docker-compose -f $(COMPOSE_FILE) down

# Open the browser
browse:
 open http://localhost:6789

#create new project
create:
 docker run -it -p 6789:6789 -v path/to/your/project:/home/src mageai/mageai \
  /app/run_app.sh mage start $(IMAGE_NAME)
Now we need to create our Mage project where our pipelines will run. We will use the following Dockerfile (provided by Mage), which includes a few Spark-specific commands. If you want to use Mage without Spark, you can simply remove the Spark-specific commands.
FROM mageai/mageai:0.9.72


ARG PROJECT_NAME=mage_demo #you can give your own name
ARG MAGE_CODE_PATH=/home/mage_code
ARG USER_CODE_PATH=${MAGE_CODE_PATH}/${PROJECT_NAME}

WORKDIR ${MAGE_CODE_PATH}


COPY ${PROJECT_NAME} ${PROJECT_NAME}

ENV USER_CODE_PATH=${USER_CODE_PATH}

# Spark Specific
RUN echo 'deb http://deb.debian.org/debian bullseye main' > /etc/apt/sources.list.d/bullseye.list

#Spark specific
# Install OpenJDK 11 and wget
RUN apt-get update -y && \
    apt-get install -y openjdk-11-jdk wget

# Spark specific
# Remove Debian Bullseye repository
RUN rm /etc/apt/sources.list.d/bullseye.list

# Install custom Python libraries
RUN pip3 install -r ${USER_CODE_PATH}/requirements.txt

RUN python3 /app/install_other_dependencies.py --path ${USER_CODE_PATH}

ENV PYTHONPATH="${PYTHONPATH}:/home/src"

CMD ["/bin/sh", "-c", "/app/run_app.sh"]
The Dockerfile above will create the Mage project, including a standalone Spark cluster (managing by Mage), avoiding the need to create a separate Spark image (although you can do that too).
Now we need to create the project (remember to change the path to your project in the Makefile). This can be done by simply running the following command in your CLI:
make create
Congratulations! You have just set up Mage. You should now see the following in your repository :

You can check the UI as well by running:
make browse

The project is currently empty and built with the mageai/mageai:latest image. Once we start adding pipelines, adjusting requirements and to include the Spark cluster, we will build our own image by simply typing:
make build
Put everything together
The last file we need to add to our repository is the docker-compose.yaml file. Since this project utilizes multiple technologies, we want them to run on the same network. Therefore, we need to create a docker-compose.yaml file to ensure they can all run together seamlessly.
version: '3'
services:
  mage:
    # the name of the image in Makefile
    image: mage_demo
    container_name: mage
    ports:
      - "6789:6789"
    volumes:
      - .:/home/mage_code
    environment:
      MINIO_ACCESS_KEY: ${MINIO_ACCESS_KEY}
      MINIO_SECRET_KEY: ${MINIO_SECRET_KEY}


  starrocks-fe-0:
    image: starrocks/fe-ubuntu:latest
    hostname: starrocks-fe-0
    container_name: starrocks-fe-0
    command:
      - /bin/bash
      - -c
      - |
        /opt/starrocks/fe_entrypoint.sh starrocks-fe-0
    environment:
      - HOST_TYPE=FQDN
      - TZ=Asia/Shanghai
      - AWS_ACCESS_KEY_ID=${MINIO_ACCESS_KEY}
      - AWS_SECRET_ACCESS_KEY=${MINIO_SECRET_KEY}
    ports:
      - "8030:8030"
      - "9020:9020"
      - "9030:9030"
    volumes:
       - singleton_fe0_data:/opt/starrocks/fe/meta
    healthcheck:
      test: ["CMD", "curl", "-f", "http://localhost:9030"]
      interval: 5s
      timeout: 5s
      retries: 30

  starrocks-be-0:
    image: starrocks/be-ubuntu:latest
    hostname: starrocks-be-0
    container_name: starrocks-be-0
    command:
      - /bin/bash
      - -c
      - |
        /opt/starrocks/be_entrypoint.sh starrocks-fe-0
    environment:
      - HOST_TYPE=FQDN
      - TZ=Asia/Shanghai
    ports:
      - "8040:8040"
    depends_on:
      - starrocks-fe-0
    volumes:
      - singleton_be0_data:/opt/starrocks/be/storage

  minio:
    container_name: minio
    image: quay.io/minio/minio
    ports:
      - '9000:9000'
      - '9001:9001'
    volumes:
      - './minio_data:/data'
    environment:
      - MINIO_ROOT_USER=${MINIO_ACCESS_KEY}
      - MINIO_ROOT_PASSWORD=${MINIO_SECRET_KEY}
    command: server --console-address ":9001" /data

volumes:
  singleton_fe0_data:
  singleton_be0_data:
  minio_data:
The docker-compose.yaml file above contains all the technologies we will use for this demo (excluding Spark, as we are using a standalone cluster as described earlier). For MinIO credentials, you can either create a .env file (which is always recommended) or hardcode them into the YAML file.
Then you can start all the services together by typing
make up
If you check Docker Desktop or run docker ps in your command line, you should see all the containers.
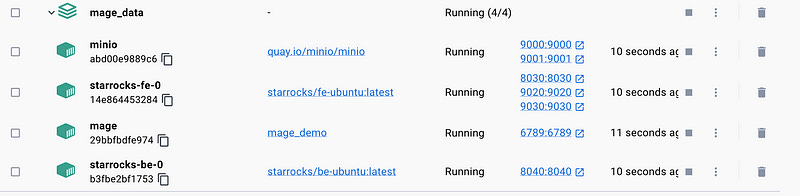
Notice that the image for Mage is the one we built, and the name must match the one specified in the Makefile, aligning with the name given to the image under the Mage service.
Now, let’s check that everything is running correctly.
To check MinIO, go to localhost:9001, and you should see the following image.

Once you enter the credentials specified either in the .env file or hardcoded in the YAML file, you should see the following:

Perfect our Minio storage works fine.
Now let’s establish the connection for StarRocks using my go-to database tool, DBeaver. It’s very easy:
Choose a new database connection.
Select MySQL (a StarRocks plugin might be available as well).
Enter the following details:
Host:
localhostPort:
9030Username:
root
4. Test the connection, and you should see the following:s

Click “OK” and then “Finish.” That’s all there is to it. You will have the connection set up (instead of “mage_demo,” it will be named “localhost” unless you rename it)

Perfect, all our services are now in place except for the last one… Spark!
The most challenging part about Spark was finding the necessary jar files for S3, Iceberg, and Delta (optional). After some searching and a lot of trial and error, I created a spark-config folder (added to .gitignore) under the mage_demo directory with the required jar files shown in the picture. You can find these jar files on Maven Repository.

Now, we need to add these jar files to the spark_config section in the project's metadata.yaml file. Add the following configuration to spark_config:
spark_config:
  # Application name
  app_name: 'MageSparkSession'
  # Master URL to connect to
  # e.g., spark_master: 'spark://host:port', or spark_master: 'yarn'
  spark_master: "local"
  # Executor environment variables
  # e.g., executor_env: {'PYTHONPATH': '/home/path'}
  executor_env: {}
  # Jar files to be uploaded to the cluster and added to the classpath
  # e.g., spark_jars: ['/home/path/example1.jar']
  spark_jars: [
    #delta
    '/home/mage_code/mage_demo/spark-config/hadoop-aws-3.3.4.jar',
    '/home/mage_code/mage_demo/spark-config/aws-java-sdk-bundle-1.12.262.jar',
    '/home/mage_code/mage_demo/spark-config/delta-storage-2.4.0.jar',
    '/home/mage_code/mage_demo/spark-config/delta-core_2.12-2.4.0.jar',
    #iceberg
    '/home/mage_code/mage_demo/spark-config/bundle-2.26.15.jar',
    '/home/mage_code/mage_demo/spark-config/url-connection-client-2.26.15.jar',
    '/home/mage_code/mage_demo/spark-config/iceberg-spark-runtime-3.5_2.12-1.5.2.jar',]
  # Path where Spark is installed on worker nodes,
  # e.g. spark_home: '/usr/lib/spark'
  spark_home:
  # List of key-value pairs to be set in SparkConf
  # e.g., others: {'spark.executor.memory': '4g', 'spark.executor.cores': '2'}
  others: {}
Since we are using a standalone Spark cluster, we will use the local spark-master. If we were using, for example, the Bitnami Spark image, we could adjust the Spark master to spark://spark:7077 or the appropriate address.
Awesome! Now that we have configured all our services (usually the most time-consuming part when starting a project), we are ready to build our pipelines and see how all the components work together.
It’s……. Showtime!!!
If you have completed all the previous steps, let’s begin by adding the following packages to our requirements.txt file.
pyspark==3.4.0
minio
delta-spark==2.4.0 #if you want to use delta
Then, build the (Mage) image by running:
make buildNext, spin up the containers with:
make upFinally, use:
make browseto open the Mage UI, allowing us to work in parallel with our IDE.
It’s time to configure our Spark session. We will add the Spark session to a factory, allowing us to extend it for other sessions, such as Delta. This spark_session_factory enables us to easily switch between configurations and makes the sessions accessible from all pipelines, so we don't need to rebuild them every time.
I will demonstrate the process specifically for Iceberg, but the factory concept ensures that you can extend this setup to include multiple sessions as needed.
from pyspark.sql import SparkSession
from abc import ABC, abstractmethod
from delta import configure_spark_with_delta_pip

class SparkSessionFactory(ABC):
    @abstractmethod
    def create_spark_session(self):
        pass

    @abstractmethod
    def configure_s3(self):
        pass

class IcebergSparkSession:
    def __init__(self, app_name, warehouse_path, s3_endpoint, s3_access_key, s3_secret_key):
        self.app_name = app_name
        self.warehouse_path = warehouse_path
        self.s3_endpoint = s3_endpoint
        self.s3_access_key = s3_access_key
        self.s3_secret_key = s3_secret_key
        self.spark = self.create_spark_session()
        self.configure_s3()

    def create_spark_session(self):
        packages = [
            "hadoop-aws-3.3.4",
            'org.apache.iceberg:iceberg-spark-runtime-3.5_2.12-1.5.2',
            'aws-java-sdk-bundle-1.12.262'
        ]

        builder = SparkSession.builder.appName(self.app_name) \
            .config("spark.jars.packages", ",".join(packages)) \
            .config("spark.sql.extensions", "org.apache.iceberg.spark.extensions.IcebergSparkSessionExtensions") \
            .config("spark.sql.catalog.spark_catalog", "org.apache.iceberg.spark.SparkCatalog") \
            .config("spark.sql.catalog.local", "org.apache.iceberg.spark.SparkCatalog") \
            .config("spark.sql.catalog.local.type", "hadoop") \
            .config("spark.sql.catalog.local.warehouse", self.warehouse_path)

        return builder.getOrCreate()

    def configure_s3(self):
        sc = self.spark.sparkContext
        sc._jsc.hadoopConfiguration().set("fs.s3a.access.key", self.s3_access_key)
        sc._jsc.hadoopConfiguration().set("fs.s3a.secret.key", self.s3_secret_key)
        sc._jsc.hadoopConfiguration().set("fs.s3a.endpoint", self.s3_endpoint)
        sc._jsc.hadoopConfiguration().set("fs.s3a.path.style.access", "true")
        sc._jsc.hadoopConfiguration().set("fs.s3a.connection.ssl.enabled", "false")
        sc._jsc.hadoopConfiguration().set("fs.s3a.impl", "org.apache.hadoop.fs.s3a.S3AFileSystem")

# Bonus Session....Delta
class DeltaSparkSession(SparkSessionFactory):
    def __init__(self, app_name, s3_endpoint, s3_access_key, s3_secret_key):
        self.app_name = app_name
        self.s3_endpoint = s3_endpoint
        self.s3_access_key = s3_access_key
        self.s3_secret_key = s3_secret_key
        self.spark = self.create_spark_session()
        self.configure_s3()

    def create_spark_session(self):
        extra_packages = [
            "org.apache.hadoop:hadoop-aws:3.3.4",
            "io.delta:delta-core_2.12:2.4.0",
            "aws-java-sdk-bundle-1.12.262",
            'delta-storage-2.4.0'
        ]
        builder = SparkSession.builder.appName(self.app_name) \
            .config("spark.sql.extensions", "io.delta.sql.DeltaSparkSessionExtension") \
            .config("spark.sql.catalog.spark_catalog", "org.apache.spark.sql.delta.catalog.DeltaCatalog")
        return configure_spark_with_delta_pip(builder, extra_packages=extra_packages).getOrCreate()

    def configure_s3(self):
        sc = self.spark.sparkContext
        sc._jsc.hadoopConfiguration().set("fs.s3a.access.key", self.s3_access_key)
        sc._jsc.hadoopConfiguration().set("fs.s3a.secret.key", self.s3_secret_key)
        sc._jsc.hadoopConfiguration().set("fs.s3a.endpoint", self.s3_endpoint)
        sc._jsc.hadoopConfiguration().set("fs.s3a.path.style.access", "true")
        sc._jsc.hadoopConfiguration().set("fs.s3a.connection.ssl.enabled", "false")
        sc._jsc.hadoopConfiguration().set("fs.s3a.impl", "org.apache.hadoop.fs.s3a.S3AFileSystem")

def get_spark_session(session_type, **kwargs):
    if session_type == "iceberg":
        return IcebergSparkSession(**kwargs)
    elif session_type == "delta":
        return DeltaSparkSession(**kwargs)
    else:
        raise ValueError("Invalid session type")
Perfect now let’s build our first pipeline. The most important thing we need at this point is… you guessed it..data!! I downloaded some random Airbnb data from here and stored it in a file in my project directory . Make sure to add this file to your .gitignore.
Creating a pipeline in Mage is very easy. Simply go to the UI, click “New Pipeline,” and select “Standard (Batch)” from the drop-down menu. You should then see the pipeline development interface.

For demonstration purposes, we will start by adding a custom block to our project. Typically, you would begin with a data loader, followed by a transformer, and then a data exporter for a classic ETL process. In this custom block, we will write our data to our S3 bucket using the Apache Iceberg format.
from minio import Minio
from pyspark.sql import SparkSession
from pyspark.sql import functions as F
import os
from mage_demo.utils.spark_session_factory import get_spark_session

# Function to stop any existing Spark session
def stop_existing_spark_session():
    try:
        existing_spark = SparkSession.builder.getOrCreate()
        if existing_spark:
            existing_spark.stop()
    except Exception as e:
        print(f"No existing Spark session to stop: {e}")

stop_existing_spark_session()

MINIO_ACCESS_KEY = os.environ.get('MINIO_ACCESS_KEY')
MINIO_SECRET_KEY = os.environ.get('MINIO_SECRET_KEY')

iceberg_spark_session = get_spark_session(
    "iceberg",
    app_name="MageSparkSession",
    warehouse_path="s3a://iceberg-demo-bucket/warehouse",
    s3_endpoint="http://minio:9000",
    s3_access_key=MINIO_ACCESS_KEY,
    s3_secret_key=MINIO_SECRET_KEY
)
client = Minio(
    "minio:9000",
    access_key=MINIO_ACCESS_KEY,
    secret_key=MINIO_SECRET_KEY,
    secure=False
)

minio_bucket = "iceberg-demo-bucket"
found = client.bucket_exists(minio_bucket)
if not found:
    client.make_bucket(minio_bucket)

@custom
def iceberg_table_write(*args, **kwargs):
    data_folder = "mage_demo/data"  # Adjust this path according to your directory structure
    for filename in os.listdir(data_folder):
        if filename.endswith(".csv"):
            file_path = os.path.join(data_folder, filename)

            # Read the CSV file into a Spark DataFrame
            df = iceberg_spark_session.spark.read.csv(file_path, header=True, inferSchema=True)
            # Write into Minio using Iceberg
            table_name = f"local.iceberg_demo.{os.path.splitext(os.path.basename(file_path))[0]}"

            if table_name.split('.')[-1] == 'listings':
                print('process listings')
                split_cols = F.split(df['name'], '·')

                is_review_present = F.trim(split_cols.getItem(1)).startswith('★')

                # Extract, clean and assign new columns
                df = df.withColumn('description', F.trim(split_cols.getItem(0))) \
                        .withColumn('reviews', F.when(is_review_present, F.trim(F.regexp_replace(split_cols.getItem(1), '★', ''))).otherwise(None)) \
                        .withColumn('bedrooms', F.when(is_review_present, F.trim(split_cols.getItem(2))).otherwise(F.trim(split_cols.getItem(1)))) \
                        .withColumn('beds', F.when(is_review_present, F.trim(split_cols.getItem(3))).otherwise(F.trim(split_cols.getItem(2)))) \
                        .withColumn('baths', F.when(is_review_present, F.trim(split_cols.getItem(4))).otherwise(F.trim(split_cols.getItem(3))))

                df = df.drop('name', 'neighbourhood_group', 'license')

            df.writeTo(table_name) \
                .createOrReplace()

    return "Iceberg tables created successfully"

@test
def test_output(output, *args) -> None:
    """
    Template code for testing the output of the block.
    """
    assert output is not None, 'The output is undefined'
You can execute the script from the UI or, in more complex scenarios, set up triggers to run it on a regular basis. It might take a couple of minutes to run, and you may see several warnings the first time, likely due to the Mage standalone cluster.

Once the block is completed, you can check if your data has been inserted into MinIO. You should see that our bucket is in place and contains all the data along with the metadata.


With Mage, you can create more complex pipelines with multiple intermediate steps.
If you want to read the data in Mage using a Python script, you can create another custom or transformation block and add the following code:
from mage_demo.utils.spark_session_factory import get_spark_session
import os
MINIO_ACCESS_KEY = os.environ.get('MINIO_ACCESS_KEY')
MINIO_SECRET_KEY = os.environ.get('MINIO_SECRET_KEY')
# Initialize Spark session and MinIO client
iceberg_spark_session = get_spark_session(
"iceberg",
app_name="MageSparkSession",
warehouse_path="s3a://iceberg-demo-bucket/warehouse",
s3_endpoint="http://minio:9000",
s3_access_key=MINIO_ACCESS_KEY,
s3_secret_key=MINIO_SECRET_KEY
)
@custom
def iceberg_table_read(*args, **kwargs):
"""
Read data from a MinIO bucket using either Iceberg .
"""
# Construct the full path to the table in the MinIO bucket
table_name = "local.iceberg_demo.listings"
# Read the table into a Spark DataFrame
df = iceberg_spark_session.spark.table(table_name)
# TODO: Further cleaning and processing can be added here
return df
@test
def test_output(output, *args) -> None:
"""
Template code for testing the output of the block.
"""
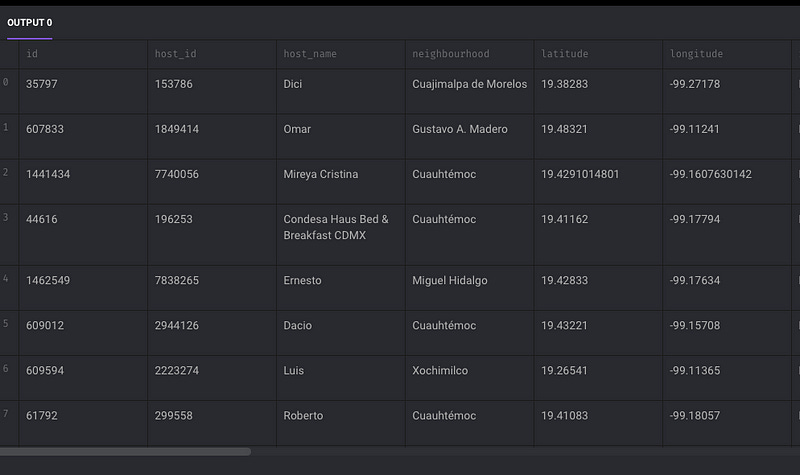
assert output is not None, 'The output is undefined'If the script runs successfully, you should see the DataFrame displayed.
However, it might be more flexible to query the data using SQL in a SQL engine. StarRocks, apart from being a robust and fast data warehouse, can be used for this purpose as well.
To query the data using SQL in StarRocks, we will need to follow these steps:
Create a Catalog: This is the first step to set up our environment for querying the data.
CREATE EXTERNAL CATALOG iceberg_catalog
PROPERTIES (
    "type"="iceberg",
    "iceberg.catalog.type"="hadoop",
    "iceberg.catalog.warehouse"="s3a://iceberg-demo-bucket/warehouse",-- same with the one in the Spark config
    "aws.s3.endpoint"="http://minio:9000",
    "aws.s3.access_key"="your access key",
    "aws.s3.secret_key"="your secret key",
    "aws.s3.enable_ssl" = "false",
 "aws.s3.enable_path_style_access" = "true"
);
Then, we can validate that the catalog was created by typing:
SHOW CATALOGS;
2. Set the Iceberg Catalog: To specify the Iceberg catalog in the current session, type:
SET CATALOG iceberg_catalog;Then we can check the databases within the catalog by typing
SHOW DATABASES FROM iceberg_catalog;
iceberg_demo is the database we want, and it matches the picture from MinIO above.
3. Then use USE to specify an active database,iceberg_demo in our case:
USE iceberg_demo;Now, we can see the tables, which will be the same as those in MinIO, by typing:
SHOW tables;
We see that our tables are in place, and now we can start exploring the data with more flexibility than in a Python script.
For example, we can perform a dummy check to see which neighborhood has the highest number of 5-star reviews:
SELECT
  neighbourhood,
  count(*) as no_reviews
FROM listings
WHERE reviews ='5.0'
GROUP BY 1
ORDER BY COUNT(*) DESC
Congratulations! You have successfully built a local data lake using all the main components necessary for a data engineering project. If you want to explore more about Delta Lake, the process is similar with some differences in transformations, which you can find detailed in the repository. For StarRocks integrations, it is slightly more complex than Iceberg, but you can find more information in the official documentation here.
Conclusion
Building a data engineering project requires many services to work together before starting to build the actual pipelines to convey data across the ecosystem. Configuring, setting up, and understanding these services is crucial for establishing a healthy system.
In this project, we have set up all the necessary services to build a local data lake, including a data pipeline orchestrator tool and a SQL engine. We initiated a Spark session for Apache Iceberg and Delta formats and performed a simple ETL process. Although simple, having this foundation set is a crucial step before creating more complex pipelines.
Of course, there are many ways to set up a project, but I hope you found this post helpful. I am always open to feedback and suggestions for improvements.
Happy learning!